
Navigate this page:
How-to Log into the ELD
Step-by-step guide
- Turn on your ignition.
Log in with your driver code.
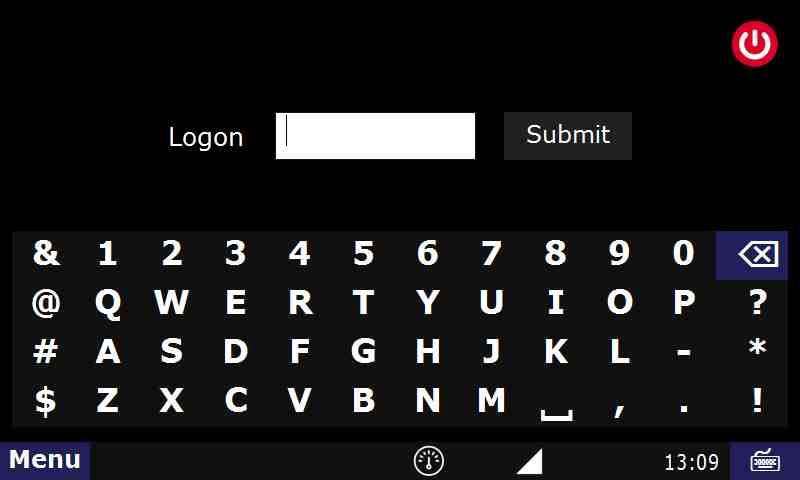
- Type in your password (if required) and touch "Submit".
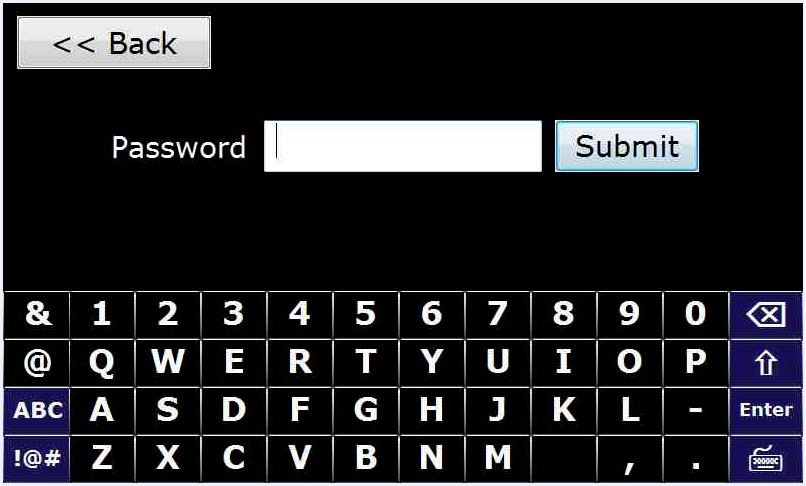
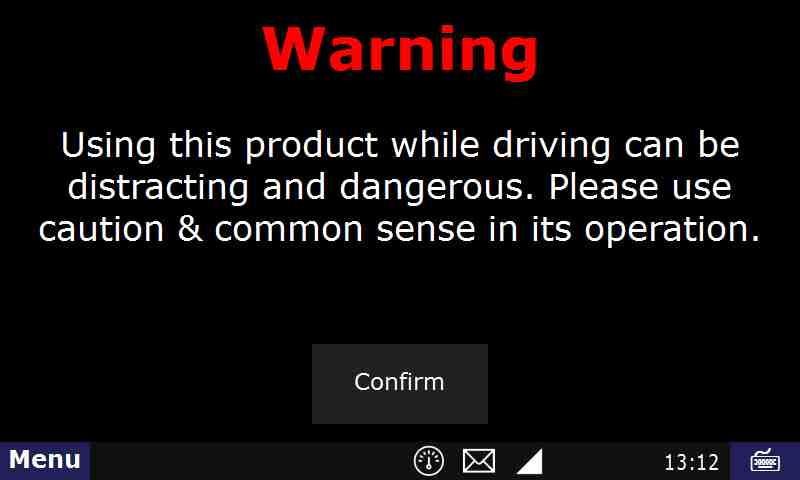
- Touch "Confirm".

You are now logged in and ready to use any of our apps.
Related articles
How-to Start Your Day
Step-by-step guide
- Turn on your ignition
- Log in with your driver code, then touch "Submit"

- Type in your password (if required) and touch "Submit".
- Touch "Confirm".
You are now logged in but you are still most likely Off-duty.
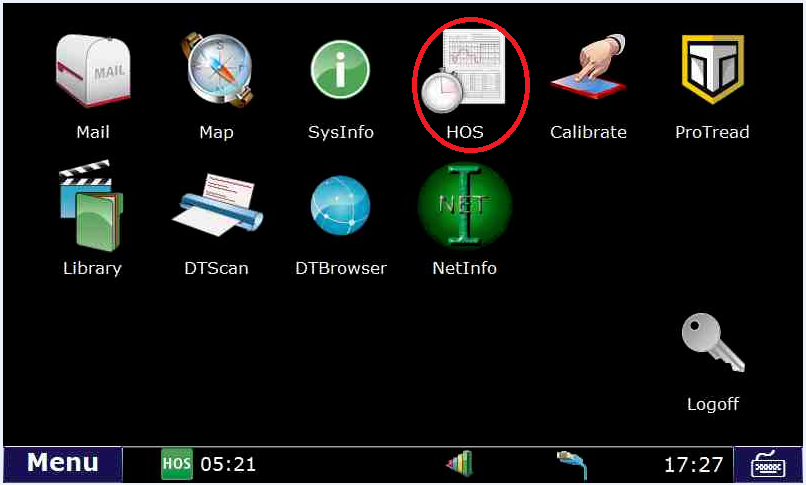
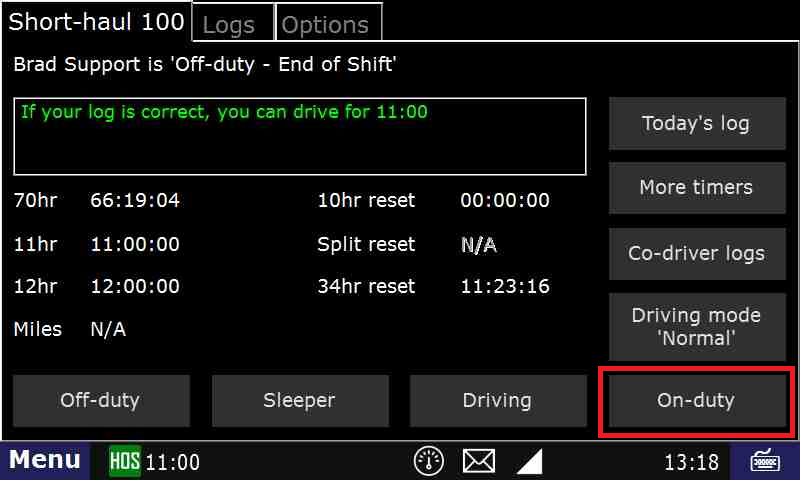
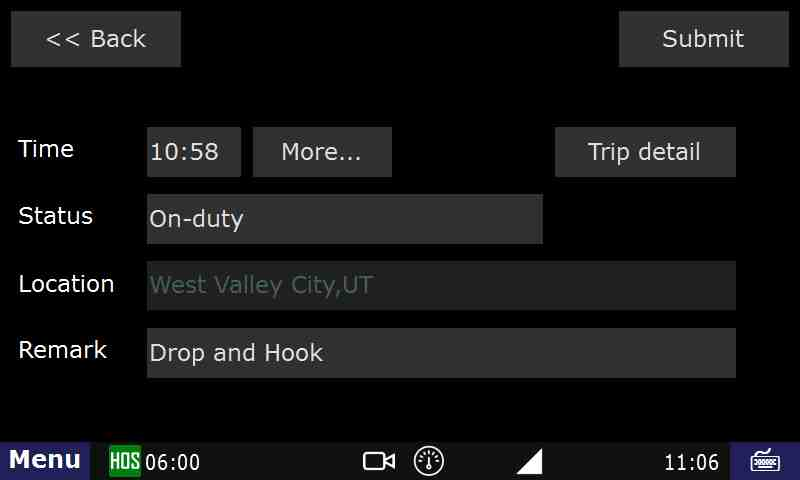
Enter an ON-DUTY STATUS
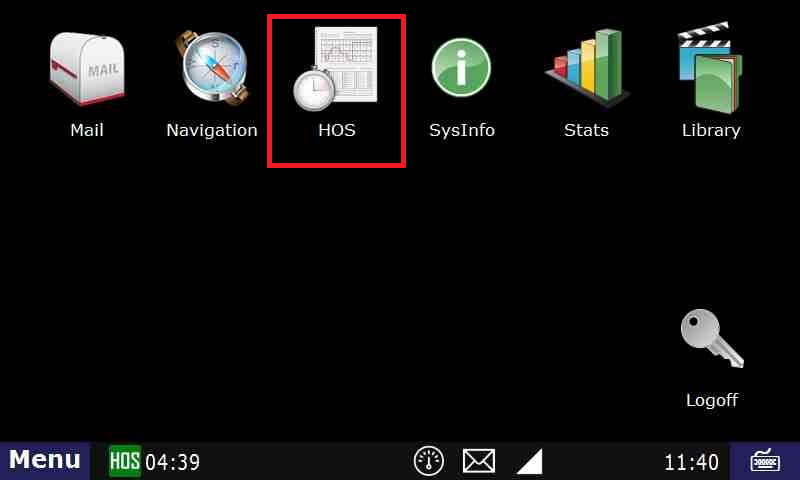
- Touch the "HOS" button.
- Touch "On-duty" which is located at the bottom of your screen.
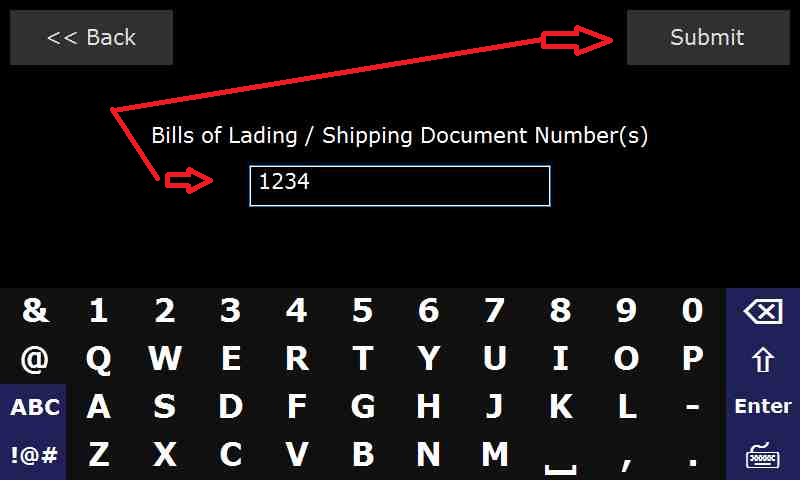
- Touch the "BOL" field.
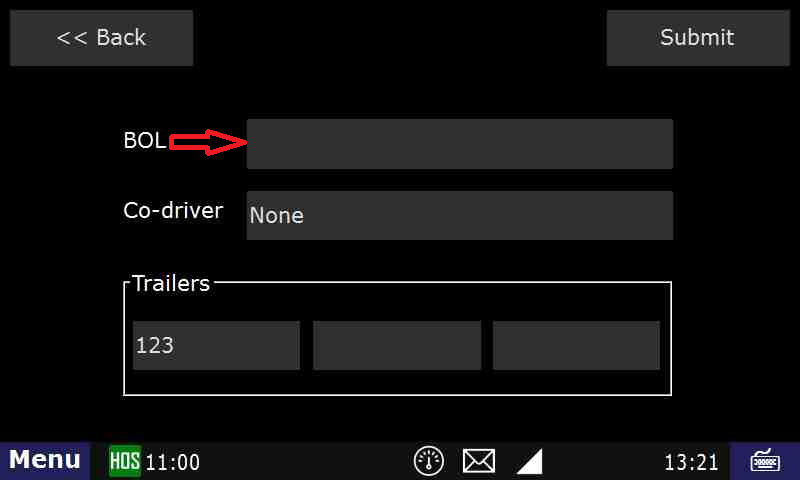
- Type in the BOL number.

- Touch "Submit" – THIS IS THE MOST IMPORTANT STEP OF ENTERING ANY STATUS.
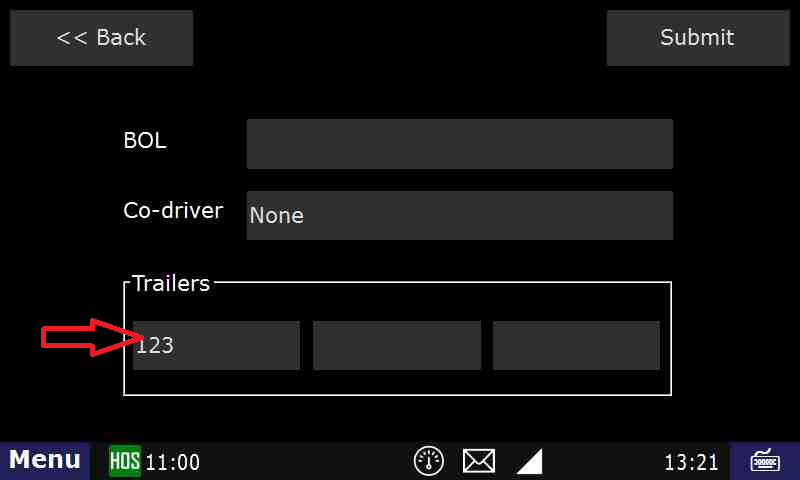
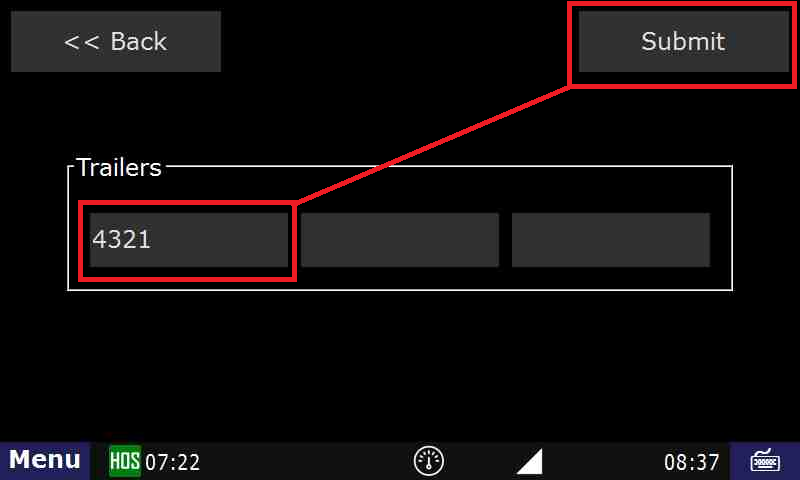
- Touch the "Trailer" field.
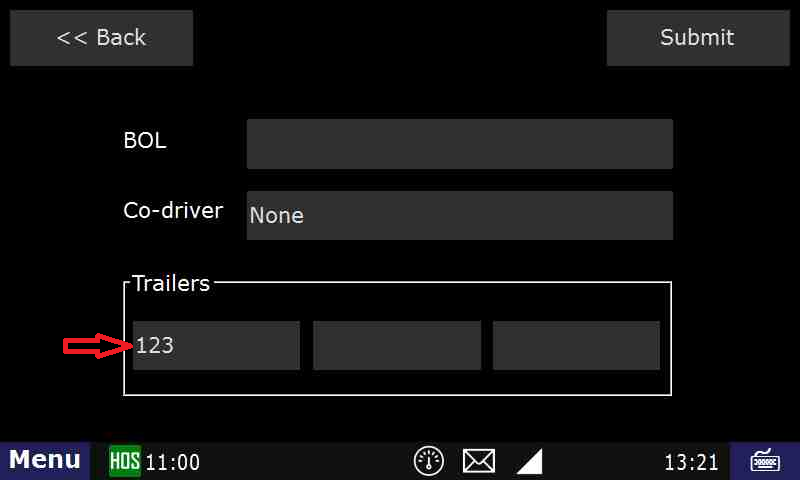
- Type in the trailer number.
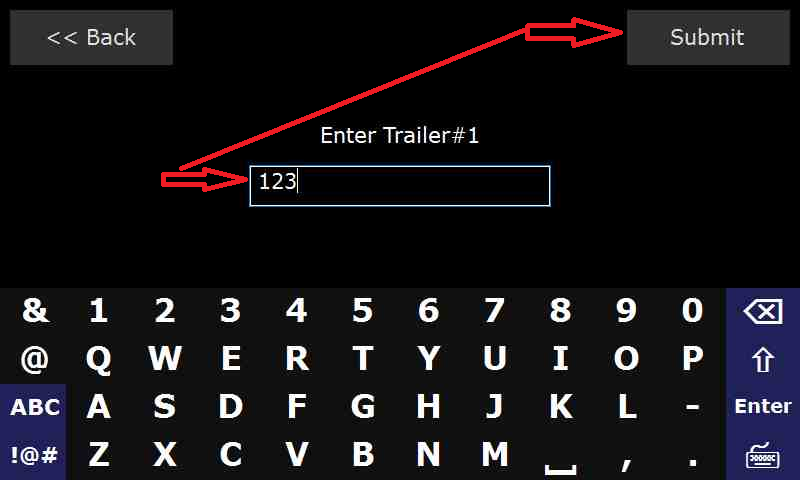
- Touch "Submit" – THIS IS THE MOST IMPORTANT STEP OF ENTERING ANY STATUS.
- Touch "Submit" again.
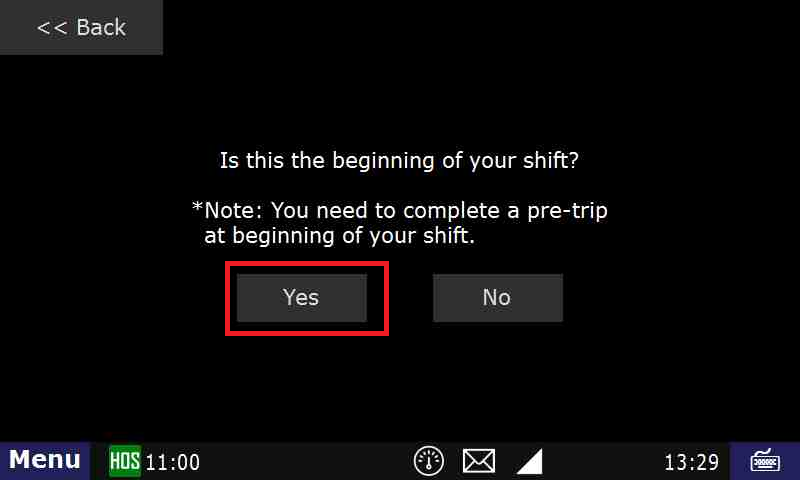
- Touch "Yes" when asked "Is this the beginning of your shift?"

- Touch "Submit" – THIS IS THE MOST IMPORTANT STEP OF ENTERING ANY STATUS.
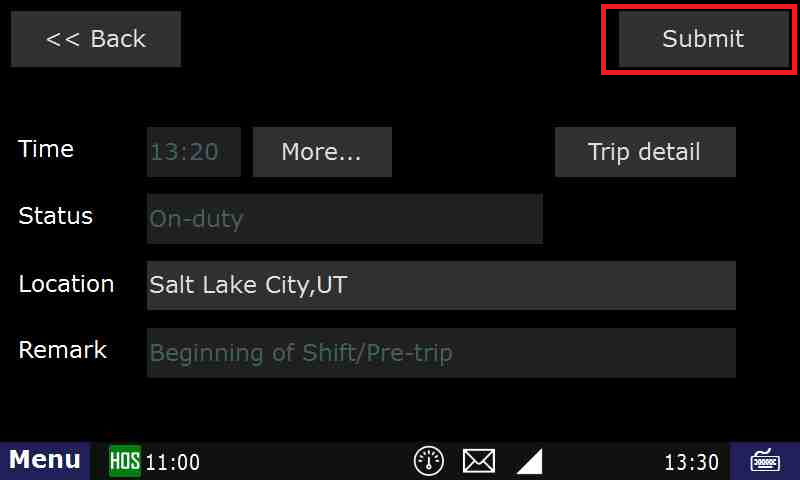
- You are now On-duty.
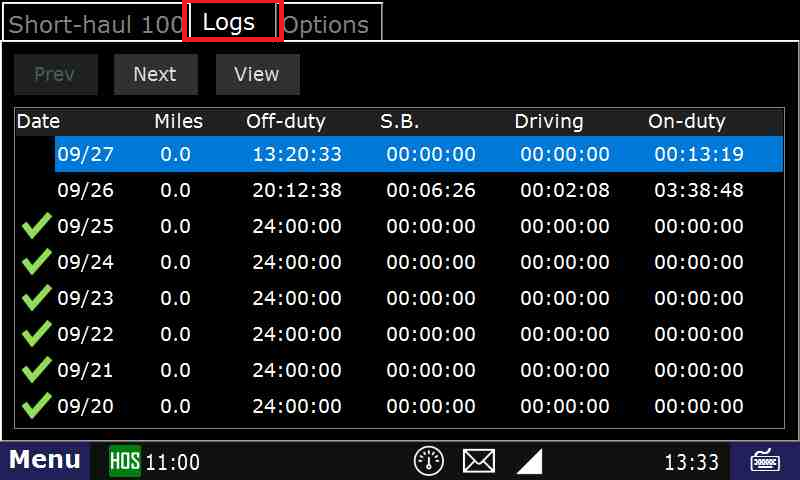
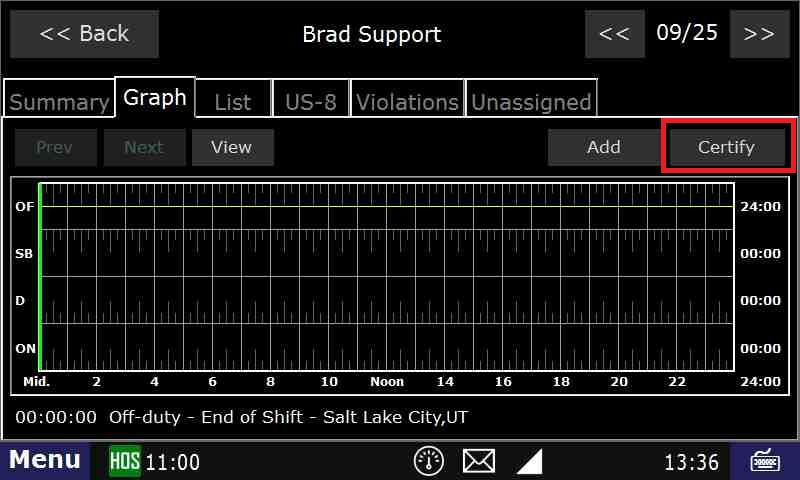
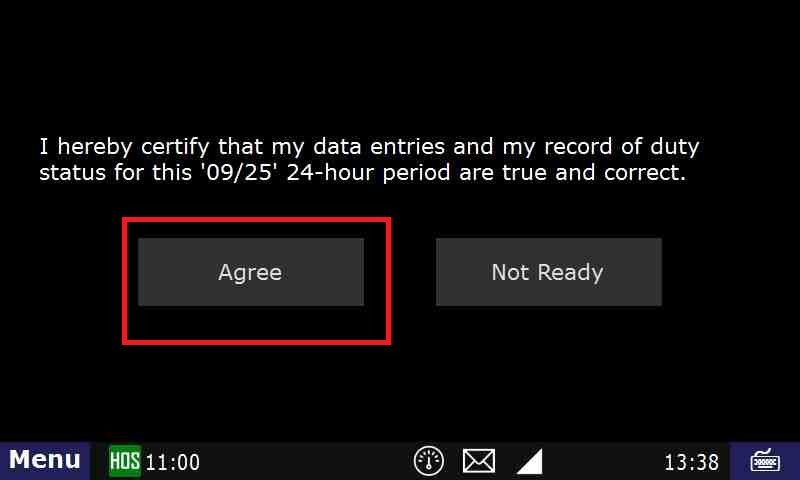
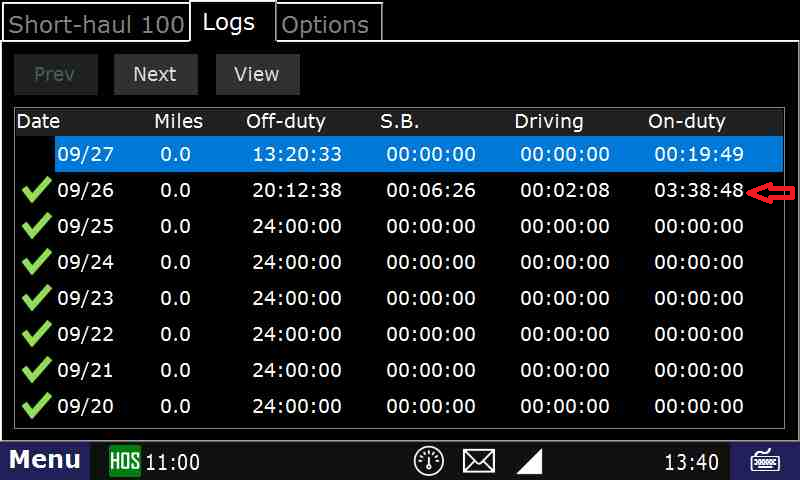
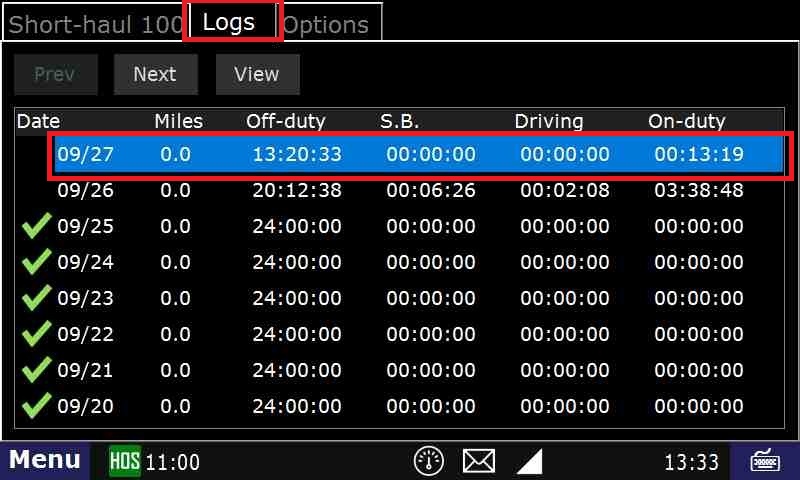
To Certify Yesterday's Log
- Touch the "Logs" tab at the top of the HOS screen.

- Open the graph for the previous day (09/26 in this example) by touching on that date.

- Touch the "Certify" button on the right hand side of the screen.
- Touch "Agree".

- Your logs for the date selected are now certified. You can verify this by the green check mark next to the date.

Related articles
How-to Start Your Day (Text Version)
Step-by-step guide
- Turn on your ignition
- Log in with your driver code
- Type in your password (if required)
- Touch "Submit"
- Touch "Continue"
You are NOW logged in but you are still most likely in Off-Duty
ENTER an ON-DUTY STATUS
- Touch HOS button
- Touch On-Duty - Which is located at the bottom of your screen.
- Touch on the BOL field
- Type in the BOL number
- Touch "Submit" – THIS IS THE MOST IMPORTANT STEP OF ENTERING ANY STATUS
- Touch the "Trailer" field
- Type in the trailer number
- Touch "Submit" – THIS IS THE MOST IMPORTANT STEP OF ENTERING ANY STATUS
- Touch "Yes" when asked "Is this the beginning of your shift?"
- Touch "Submit" – THIS IS THE MOST IMPORTANT STEP OF ENTERING ANY STATUS
TO CERTIFY YESTERDAY'S LOG
- Touch on the "Logs" tab located at the top of the screen
- Open the graph for the previous day.
- Touch on the previous day's date.
- Touch "Certify"
- Touch "Yes"
- Your log for the date selected is now certified. You can verify this by seeing the green check mark next to the date.
Related articles
How-to go into On-Duty
Step-by-step guide
- Touch "HOS" button
- Touch "On-Duty" - Which is located at the bottom of your screen.

- Touch on the "BOL" field

- Type in the "BOL" number
- Touch "Submit" – THIS IS THE MOST IMPORTANT STEP OF ENTERING ANY STATUS
- Touch the "Trailer" field
- Type in the trailer number

- Touch "Submit" – THIS IS THE MOST IMPORTANT STEP OF ENTERING ANY STATUS
- Touch "Submit" again.
- Touch "Yes" when asked "Is this the beginning of your shift?" NOTE: IF THIS IS NOT the "Beginning of your Shift" you will not see this page. You will be taken the "Select Remark" page. Touch the Remark you would like on your On-Duty status and then Touch "Submit"
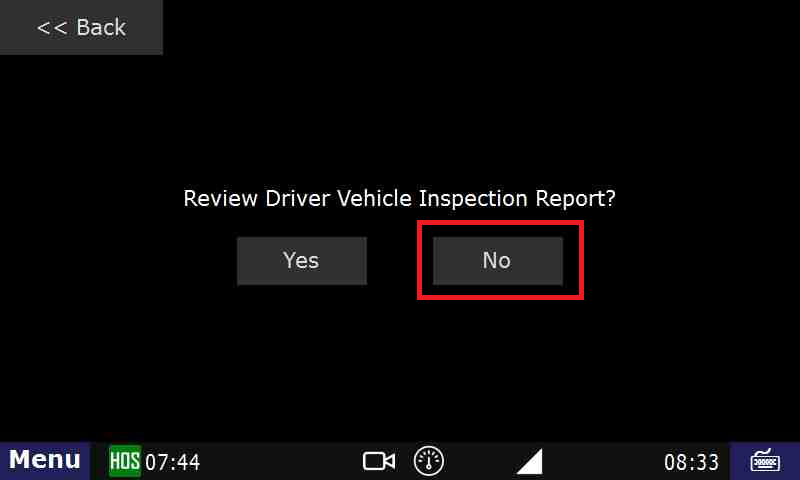
- if this is the beginning of your shift, you will be asked if you want to review the DVIR.
- If there are no issues with the truck and trailer, you can tap "No" there.
- If there is an existing DVIR that you want to review, tap Yes.
- If there are issues with the truck/trailer, you will need to create a DVIR. Click Here for instructions.
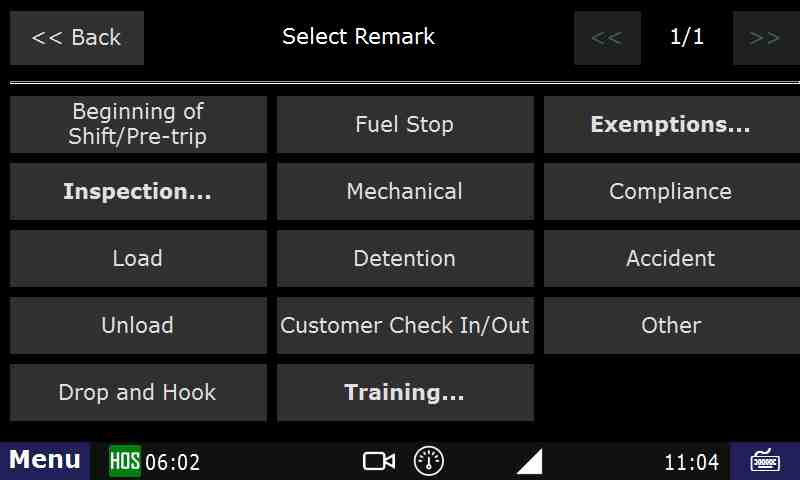
- If this is not the beginning of your shift, select a Remark.
- If this is the beginning of your shift. Just hit Submit from here
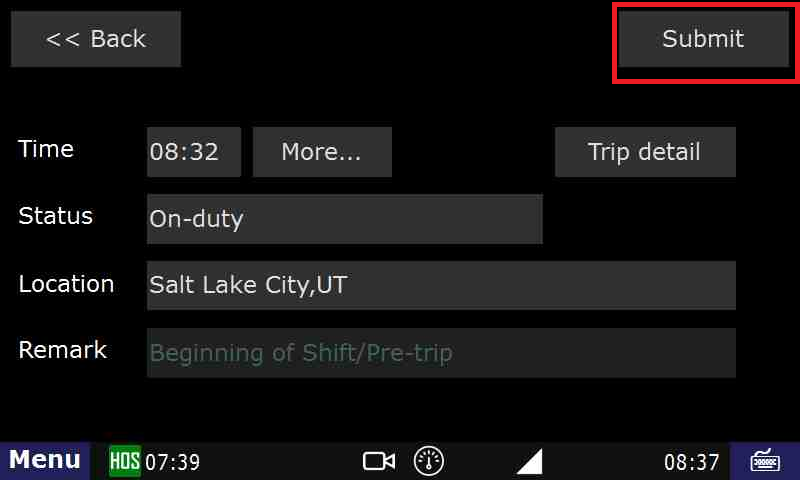
Touch "Submit" – THIS IS THE MOST IMPORTANT STEP OF ENTERING ANY STATUS
You should now be On-Duty.
Related articles
- Touch "HOS" button
How-to Certify Your Logs
Step-by-step guide
- Touch the "HOS" icon.

2.Touch the "Logs" tab at the top of the HOS screen.
3. Open the graph for the previous day (09/26 in this example) by touching on that date.
4. Touch the "Certify" button on the right hand side of the screen.
5.Touch "Agree".
Related articles
How-to go On-Duty From the HOS Graph (Text Version)
Step-by-step guide
From the Graph tab in the HOS application, touch the "Add" button.
If prompted, enter your location into the location field.
- Touch "On-Duty" from the list of available duty statuses on the "Select Duty Status" screen.
- Enter your BOL, Co-driver (if applicable) and Trailer(s) into the provided fields and touch "Submit."
- Answer "Is this the beginning of your shift?" with either "Yes" or "No" and follow the prompts.
- Select from the list of remarks on the "Select Remark" page or choose "Other" to add a custom remark.
- Follow the prompts and touch "Submit."
You are now back at the HOS Graph tab and your status is now "On-Duty".
Related articles
- Unable to render {include} The included page could not be found.
How-to End Your Duty Day
Step-by-step guide
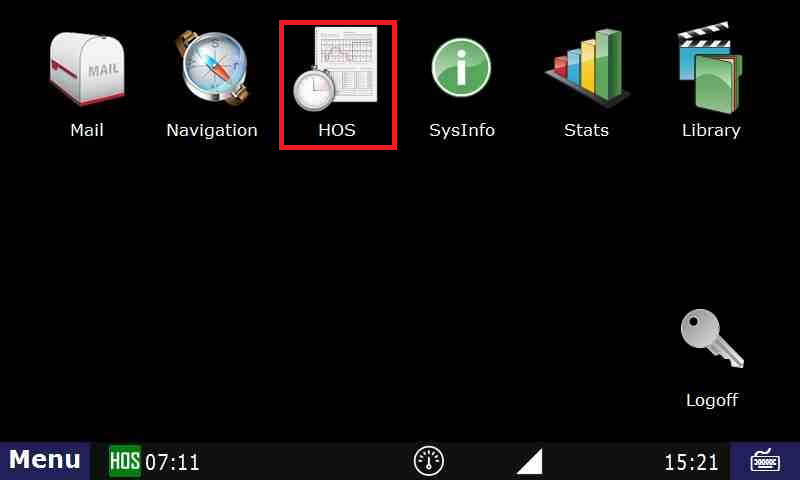
From the main Menu, select the HOS option
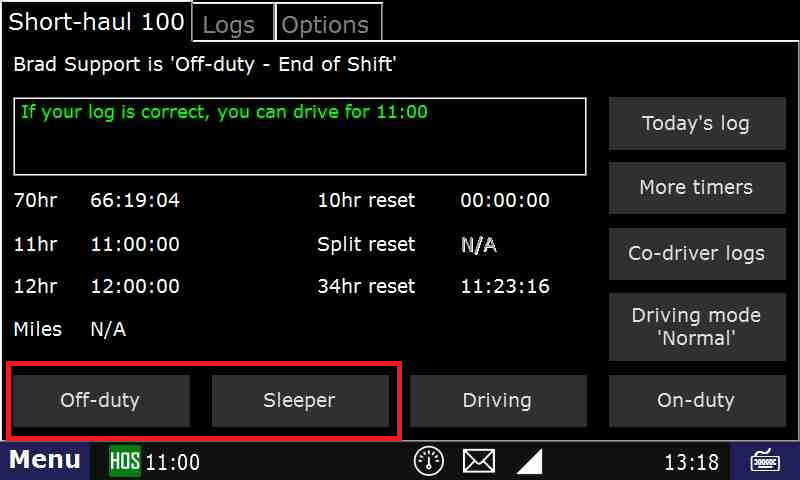
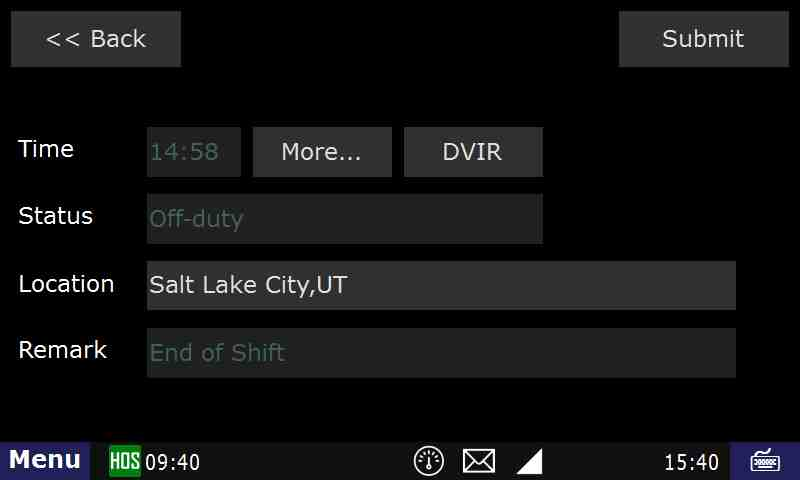
Ending your shift is accomplished by touching "Off-duty" or Sleeper berth" from the "US-8" tab, "Short-haul 100" if you're local.
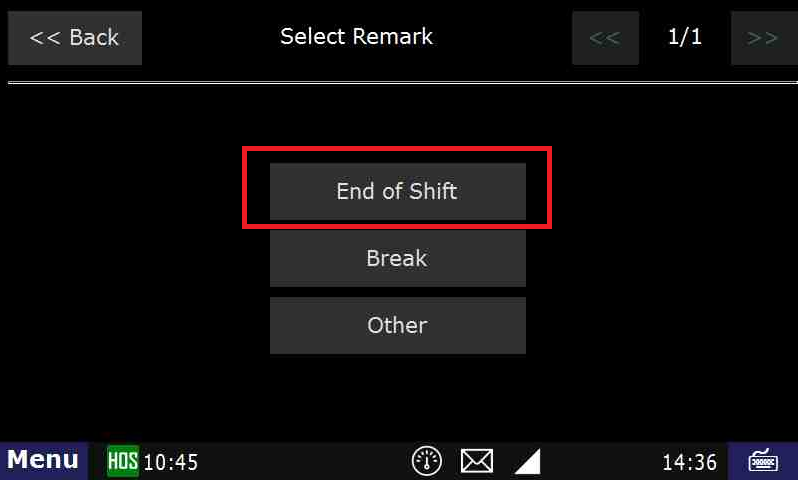
- Touch "End of Shift"
.
- If you need to enter a post-trip inspection (DVIR), touch "Yes" when asked "Enter Driver Vehicle Inspection Report?"
For instructions on entering a DVIR, Click Here
- Confirm Off-duty or Sleeper Berth, and end of shift, by touching "Submit".
- If your logs are correct and up to date, press "Yes" on the following screen. If not, press "No".
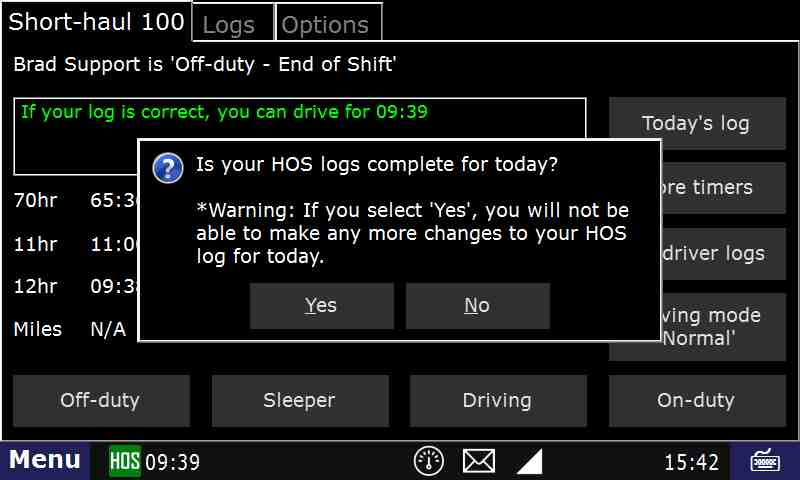
- Your duty day has now ended and your log for the day is certified.
- If you need to go back on-duty after ending and certifying your day, touch Not Ready. If you don't, touch Agree.
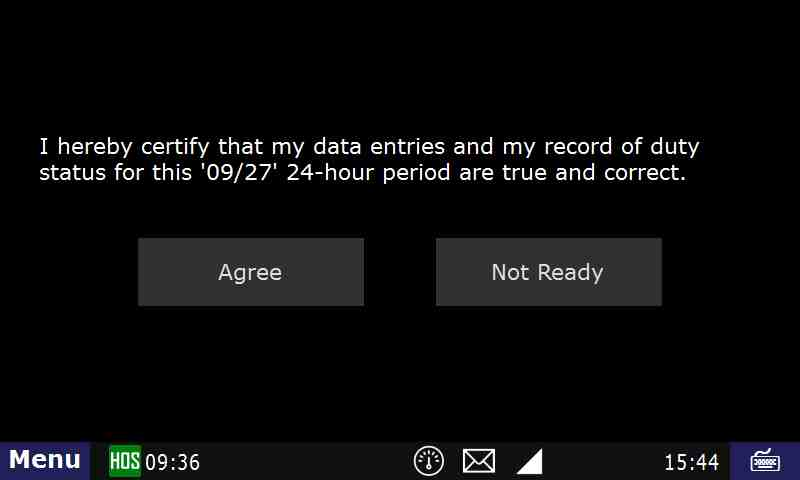
- There will be one more confirmation screen to ensure that you do not un-certify your logs by mistake.
Related articles
How-to End Your Duty Day (Text Version)
Step-by-step guide
- Ending your shift is accomplished by touching "Off-duty" or Sleeper berth" from the "US-8" or "Logs" tab.
Touch "End of Shift"
- If you need to enter a post-trip inspection (DVIR), touch "Yes" when asked "Enter Driver Vehicle Inspection Report?"
- For instructions on entering a DVIR, Click Here
- Confirm Off-duty or Sleeper Berth, and end of shift, by touching "Submit".
- If your logs are correct and up to date, press "Yes" on the following screen. If not, press "No".
- Your duty day has now ended and your log for the day is certified.
- If you need to go back on-duty after ending and certifying your day, you may select "On-Duty" from the HOS screen and touch "Yes"
Related articles
How-to Create DVIR
Step-by-step guide
While a pre-trip inspection is required to be performed by the driver every time they go On-Duty - Beginning of Shift, a DVIR is not required if no defects were found during the inspection.
For On-Duty instructions. Click Here
The driver is able to Add a DVIR at any time by opening HOS
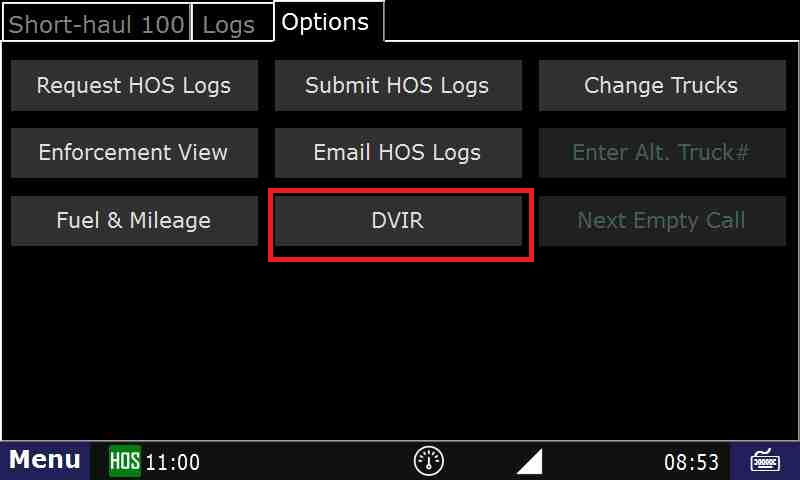
- Tap on the HOS button from the Menu

- Then select “Options > DVIR"
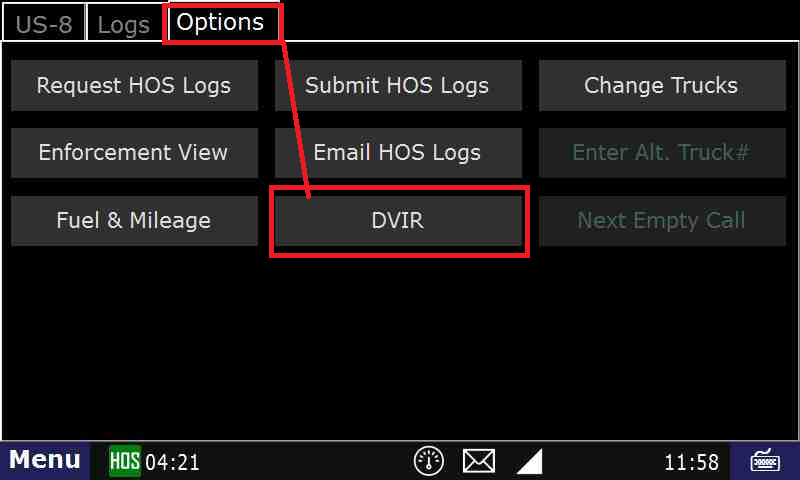
- Add DVIR.”

- Enter a trailer number if necessary, then Submit
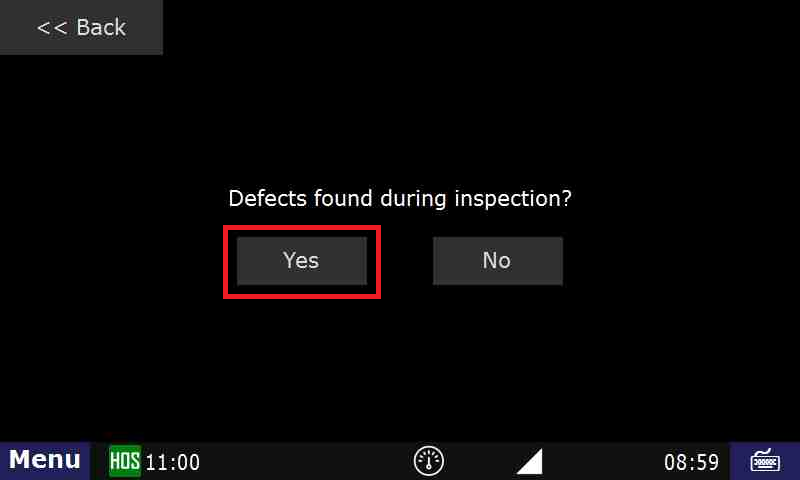
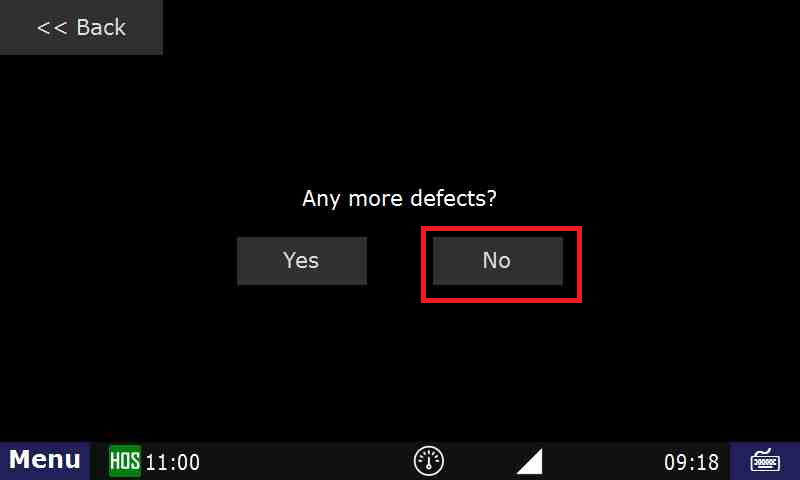
- When you start a DVIR, it will ask if any defects were found during the inspection. If so, press “Yes”
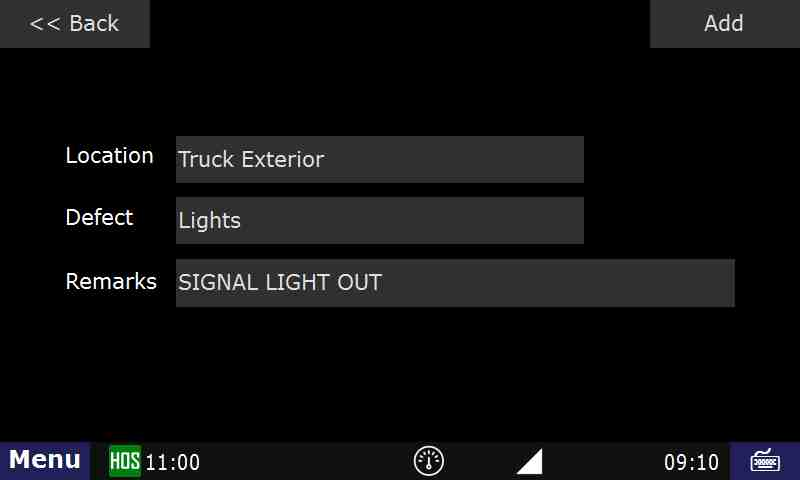
- Enter Locaion, Defect, Remarks. Then Add
- This step will ask you where the defect is located, and a description of the defect itself. You can also add additional remarks about the defect
- After choosing “Location”, select where the defect is located. Here we will be selecting “Truck Exterior”. Click on Add
- Once the defect is added and there are no more defects to submit, touch No
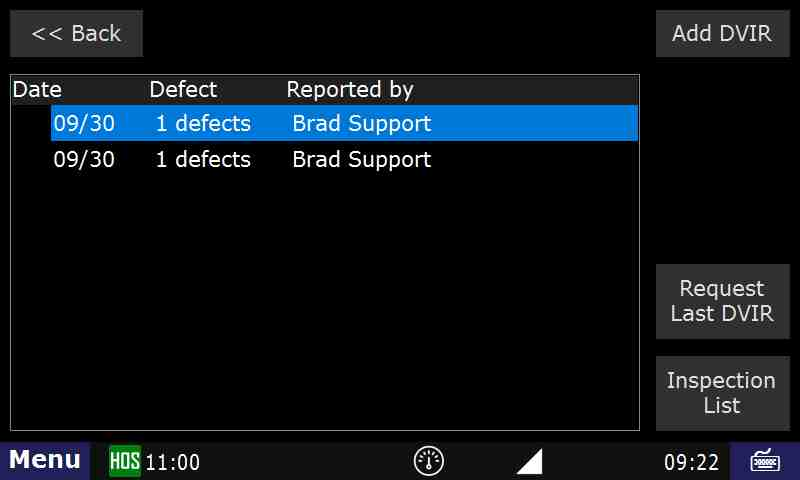
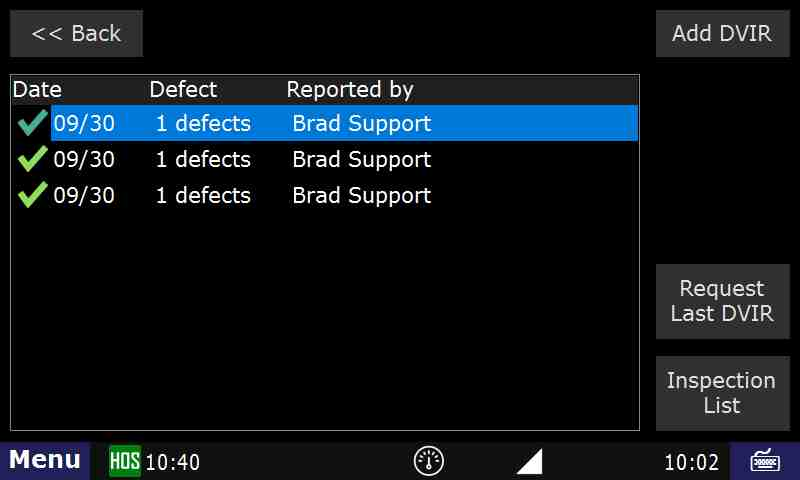
- After you press “Submit”, you will then be able to view the status and DVIR in the “List” tab for the current day’s log
- Tap on the HOS button from the Menu
Related articles
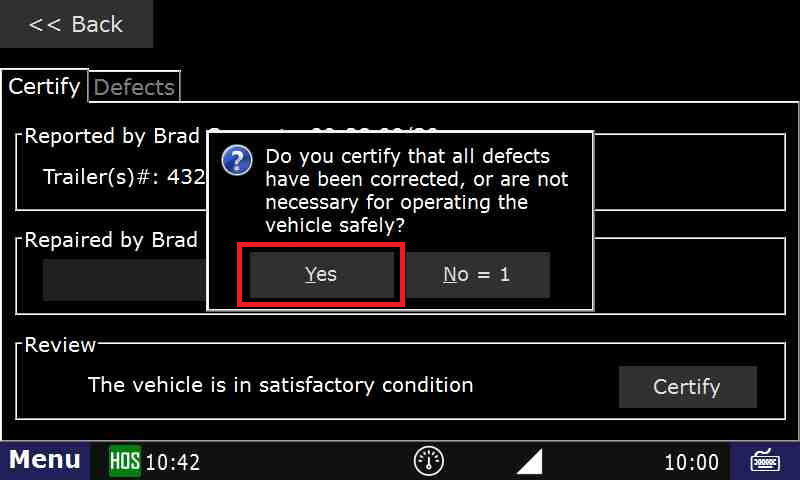
How-to Review and Certify your DVIR
Step-by-step guide
- Touch "HOS" button

- Touch the Options tab, then touch DVIR
- Touch the "DVIR" you would like to review
- While going through the On-Duty status, if you click "Yes" to review the DVIR, you will be taken to this screen.
- While going through the On-Duty status, if you click "Yes" to review the DVIR, you will be taken to this screen.
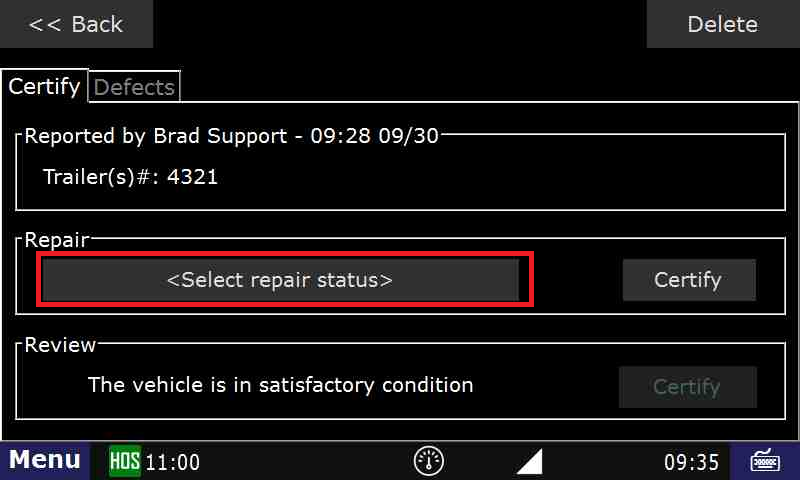
- Touch <Select repair status>
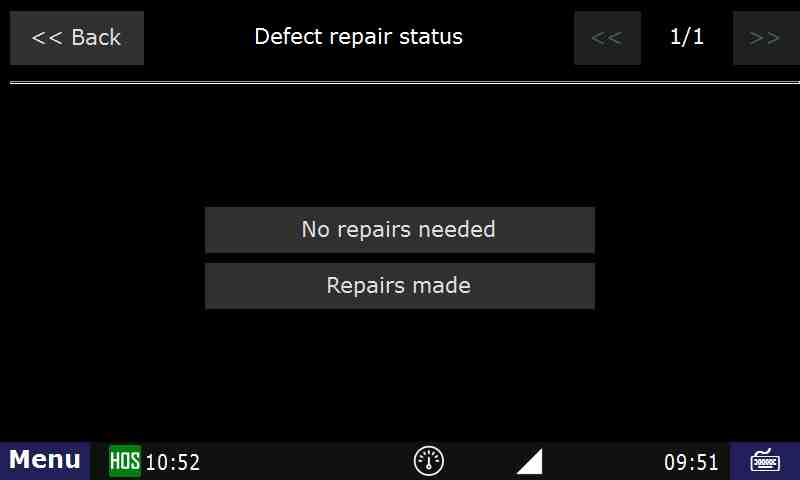
- Situations will vary. Touch No Repairs Needed or Repairs made. For this example,we'll select Repairs made
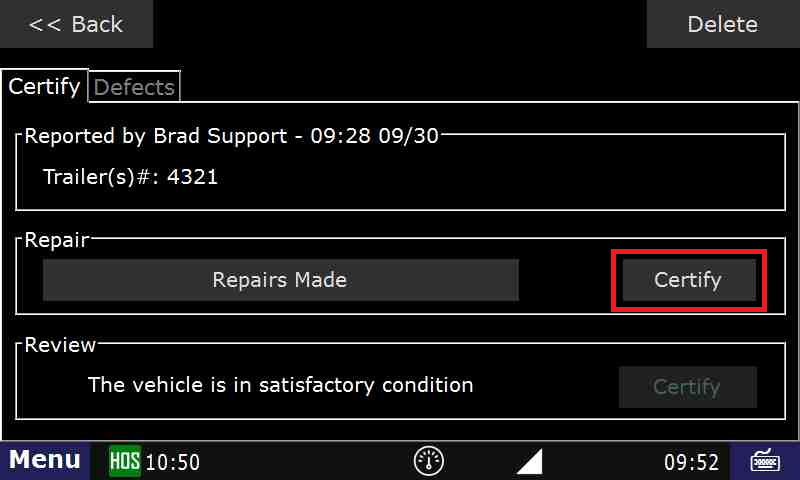
- Touch Certify
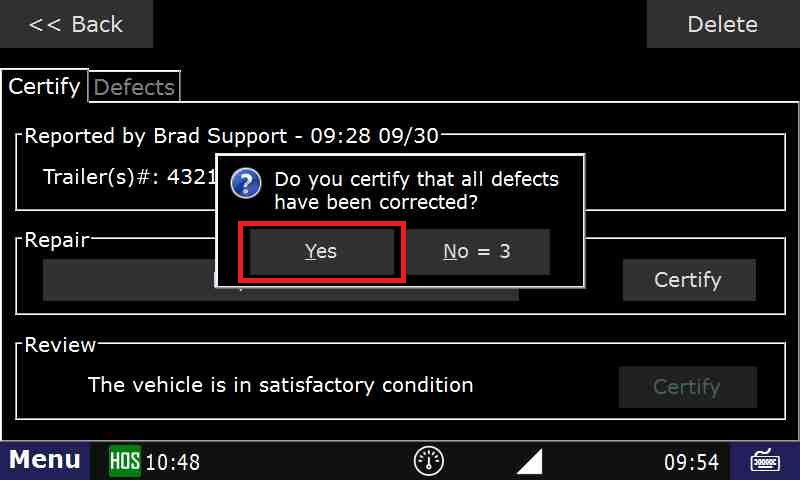
- Touch Yes
- The defect section will change to "Repairs Made". Under the vehicle review, touch Certify, then touch Yes.
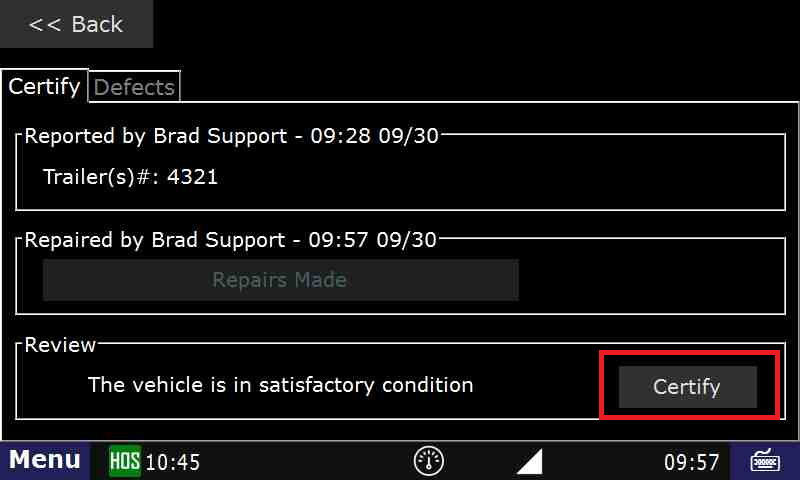
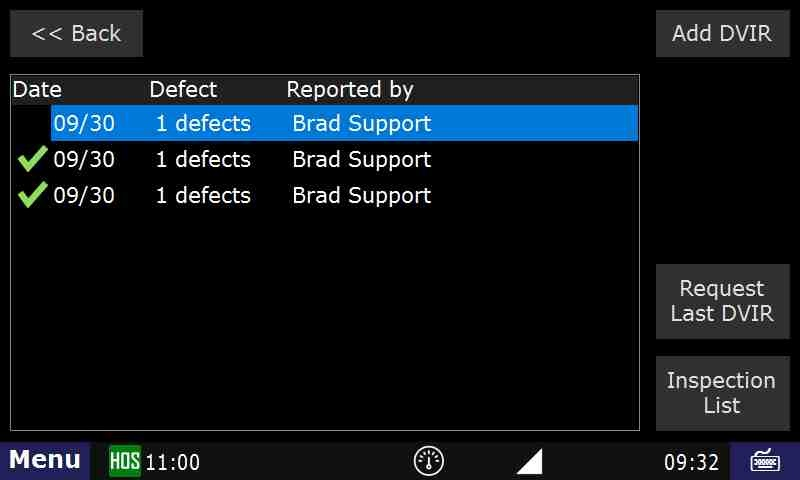
- The green check mark indicates that this DVIR has been reviewed, certified, and the reason the DVIR was created is no longer an issue.
Related articles
- Touch "HOS" button
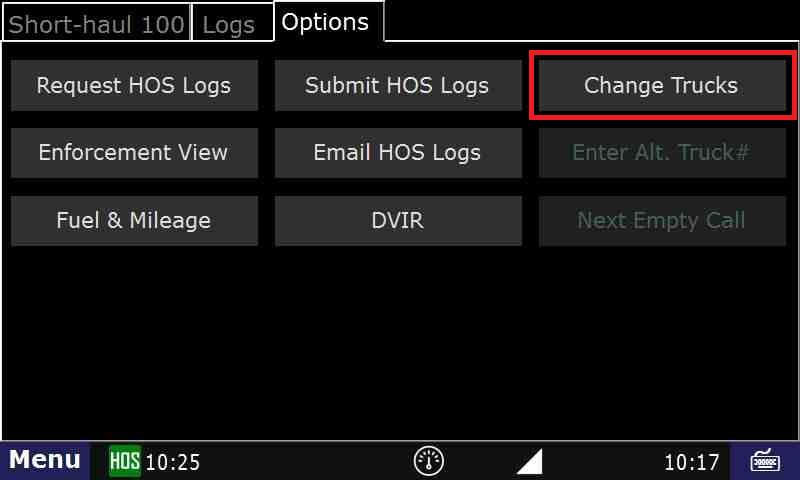
How-to Change Trucks
Step-by-step guide
From the US-8 screen in HOS, touch the "Options" tab.

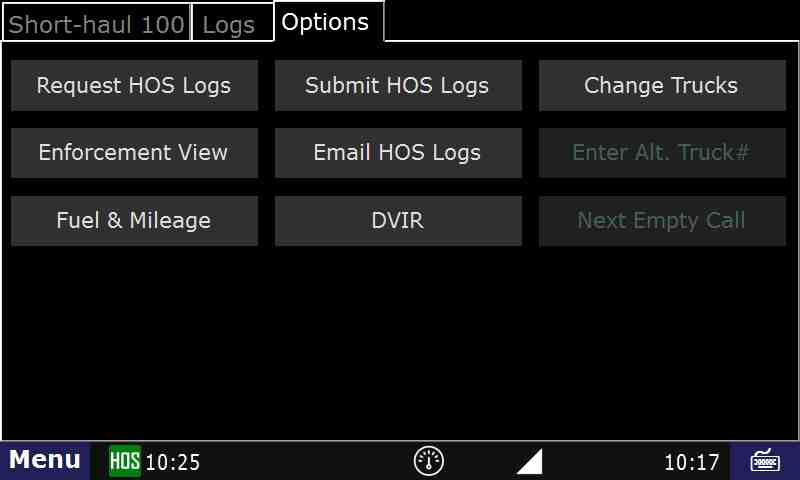
From the Options menu, touch "Change Trucks".
- You will be logged off of the unit after your logs have been received.

- If the logs were NOT sent for whatever reason, you will be placed back onto the main HOS screen. Your logs will be sent and you will be logged off as soon as the unit is able to communicate.
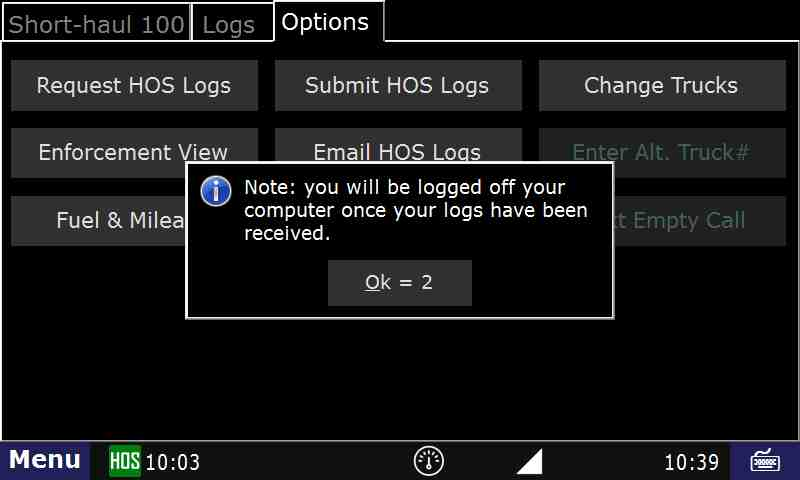
- If your logs were sent you will see the login screen.

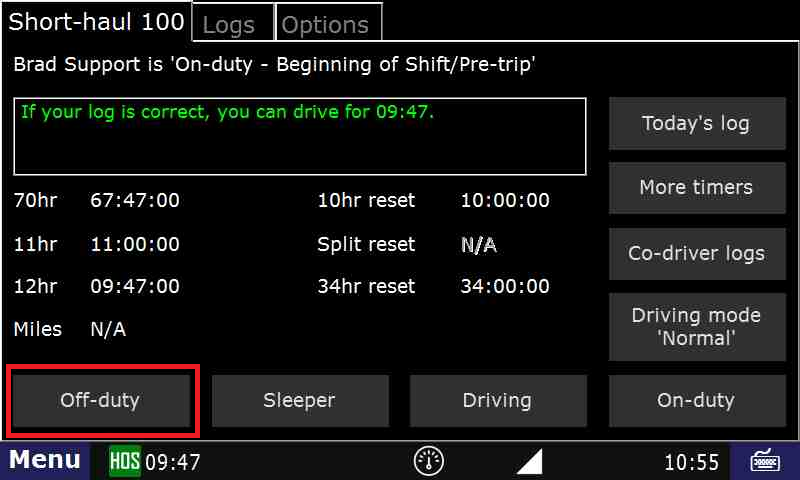
- You have now successfully changed trucks and are able to login to a new unit.
- To ensure that your HOS logs are transferred, go back to HOS and Options and touch "Request HOS Logs"
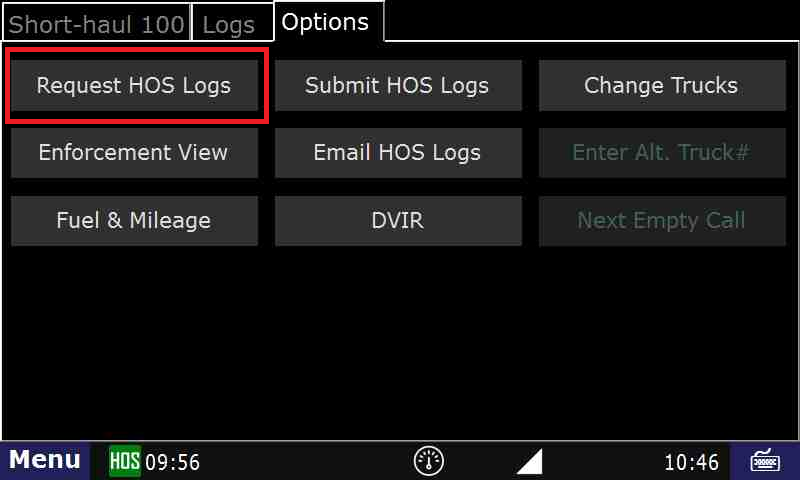
- Touch "Yes".

Your logs will now be uploaded to your new unit.
Related articles
How-to go into Off-duty
Step-by-step guide
From the main Menu, select the HOS option.

From the US-8 screen (Short-haul 100 if you're local) in HOS, touch "Off-duty"
Next touch "End of Shift" if your duty day is complete, "Break" if you are taking a break, or "Other" for any other circumstance. In this example we will touch "Break".
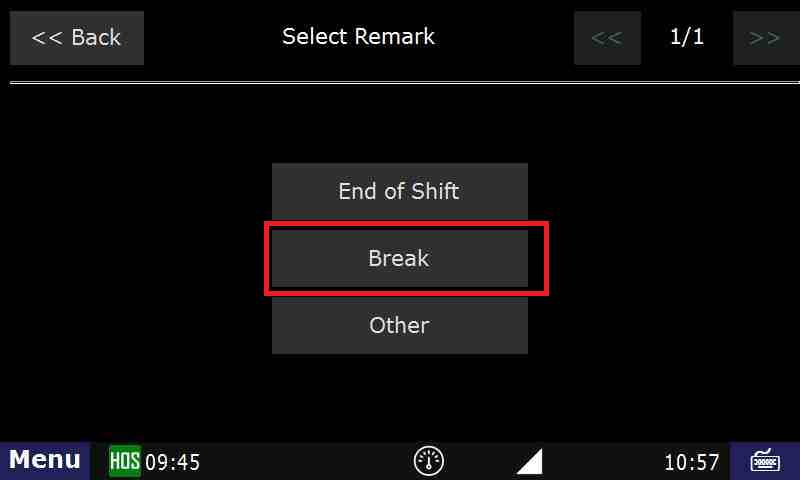
- Review the details on the next screen. If correct, touch "Submit".
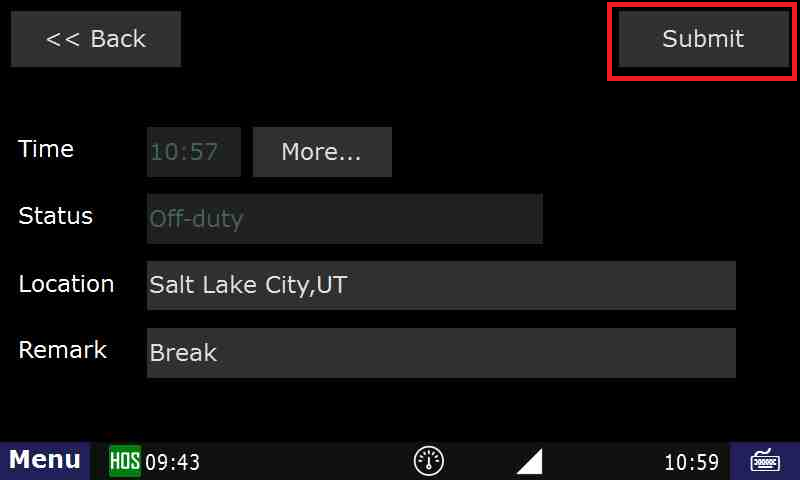
You are now in Off-duty, and on break.
Related articles
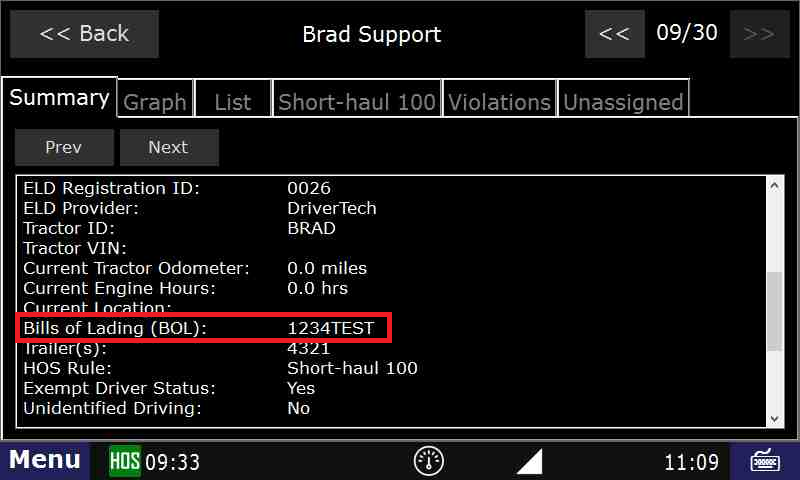
How-to View Your BOL
Step-by-step guide
From the main Menu, touch the HOS option

Touch the "Logs" tab.

Touch the day that you would like to view.
- Touch the Summary tab, (Notice your co-driver info is here) then Next
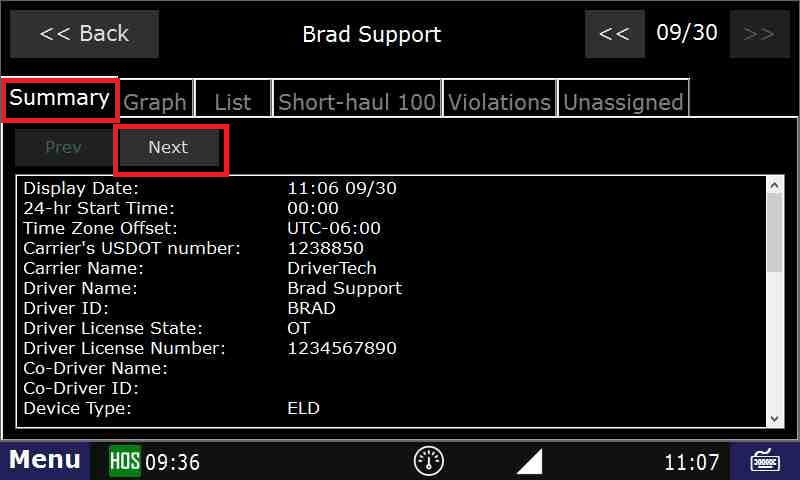
- The BOL, as well as your trailer information is displayed on this page.
Related articles
How-to go into Sleeper Berth
Step-by-step guide
From the main Menu, touch the HOS option.

From the US-8 screen, touch "Sleeper".
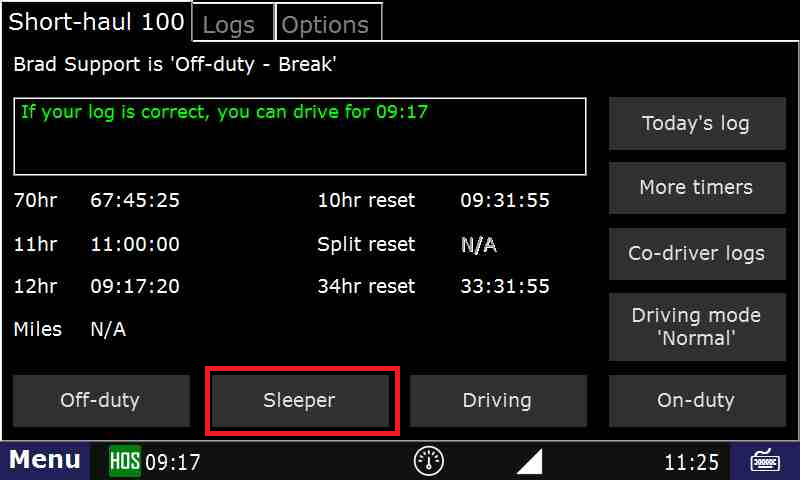
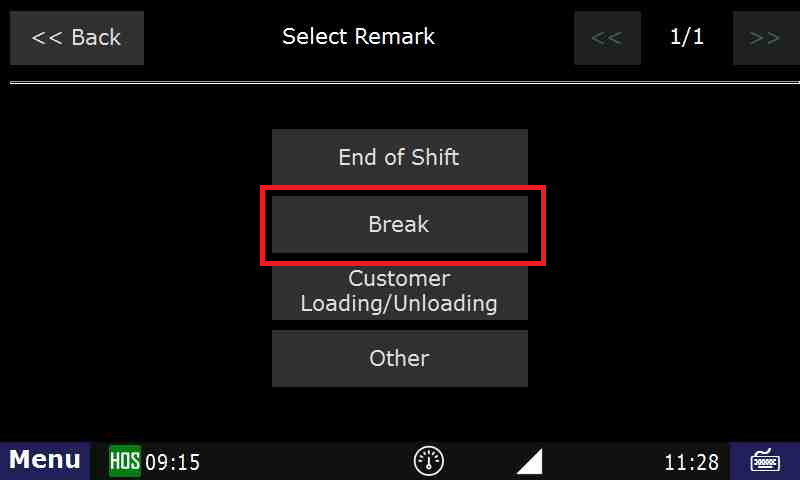
Next touch "End of Shift" if your duty day is complete, "Break" if you are taking a break, or "Other" for any other circumstance. In this example, we will touch "Break".
- Review the details on the next screen. If correct, touch "Submit".
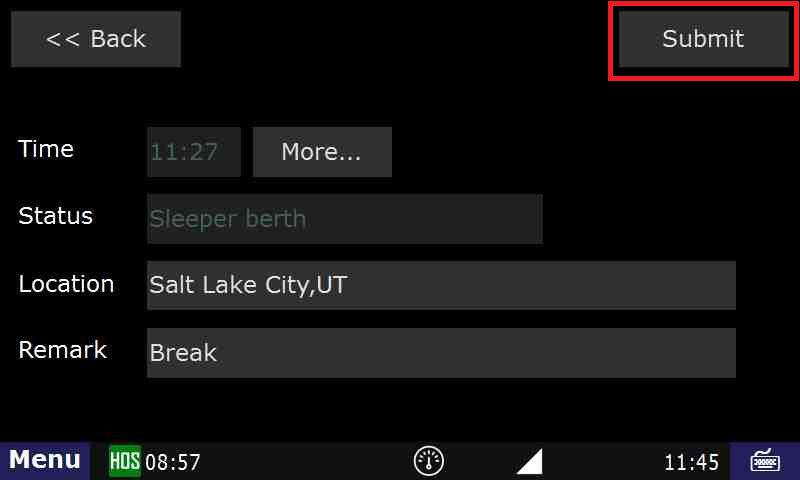
- You are now in Sleeper berth - Break.
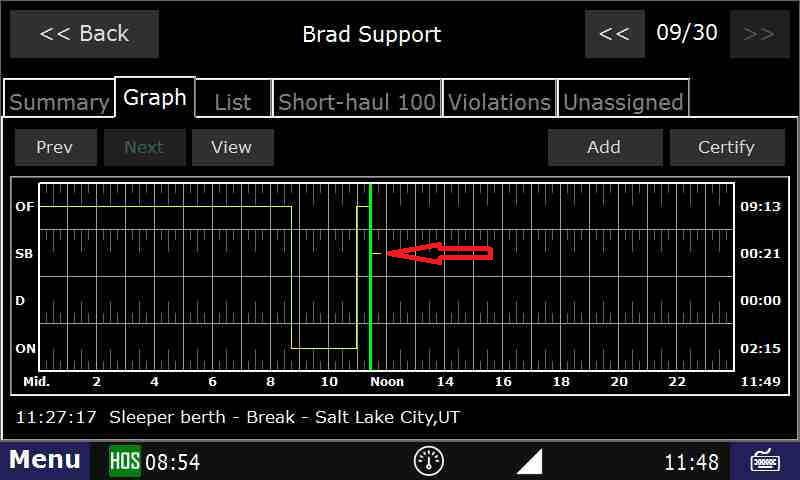
Related articles
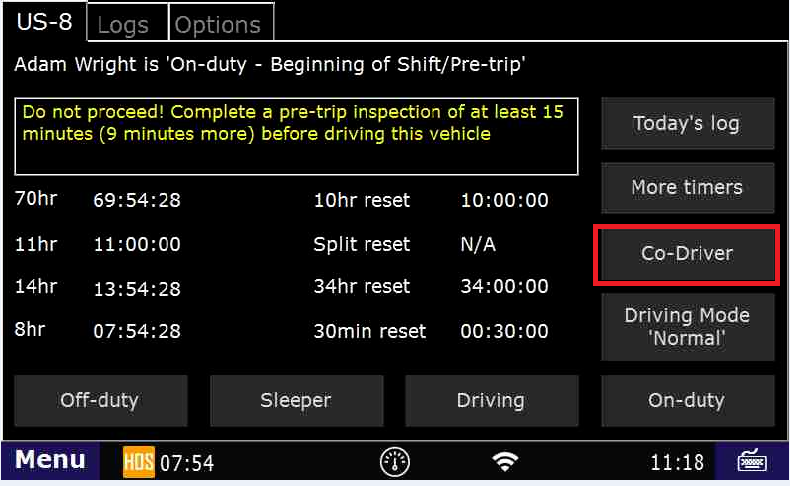
How-to Assign a Co-Driver
1st driver logs in, goes into Sleeper Berth. Or, Driver #1 logs in, goes on duty, then logs out.
The current driver always logs in 2nd. Driver #2 then goes into Driving status.Step-by-step guide
The co-driver (the person who is not driving first) logs into the unit
- The co-driver should enter their desired status (on-duty is most likely)
- The co-driver logs out
- The driver logs in
- The driver goes on-duty
- While going on-duty the driver selects the "Co-driver" field
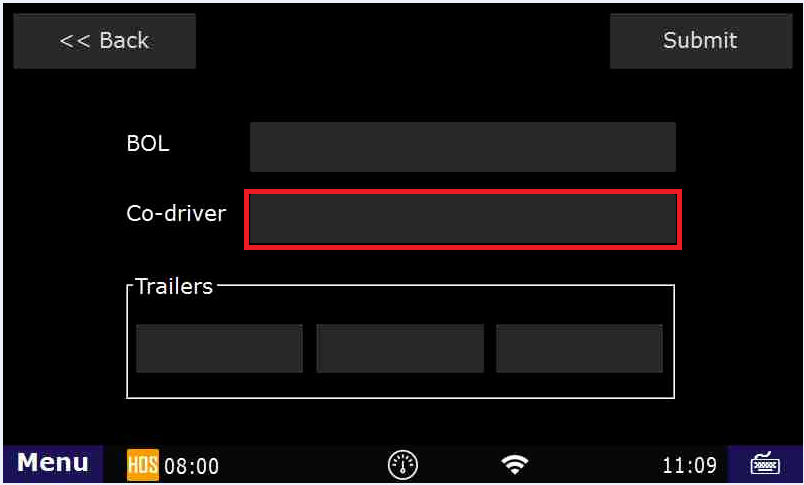
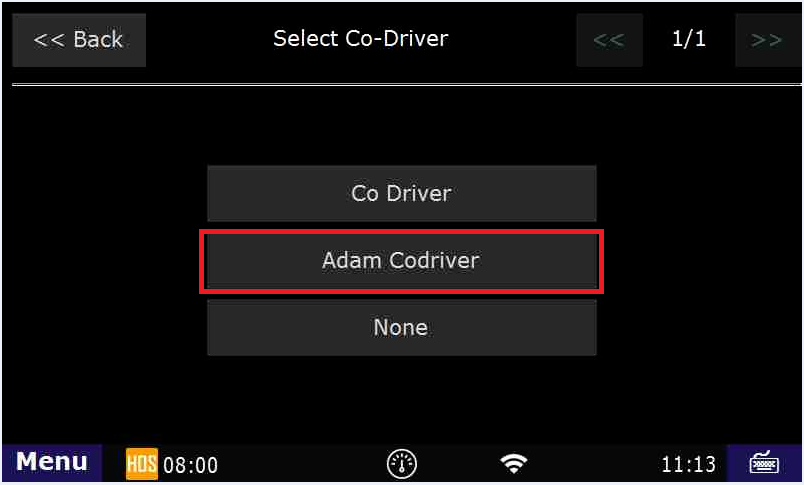
From the "Select Co-Driver" screen select your co-driver's name
- After selecting your Co-driver you screen will look similar to this:
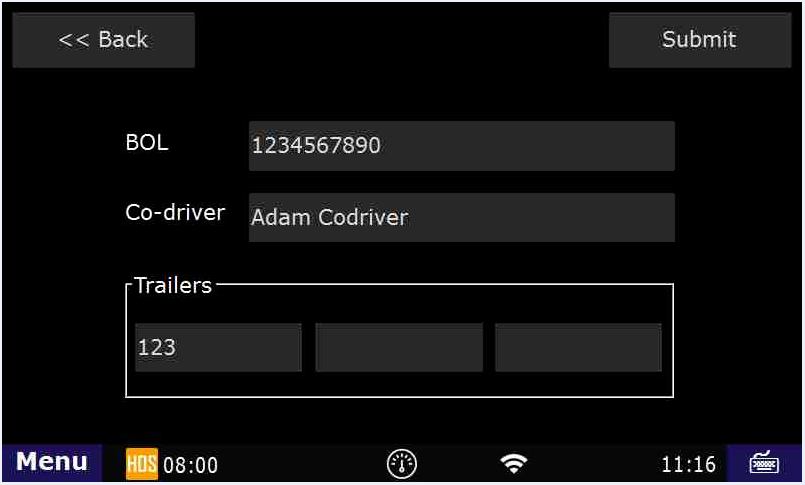
- Now, as long as the information on this screen is correct, you can select "Submit"
- Answer any additional prompts and then select "Submit" again
- You now have a co-driver assigned, and can use the "Co-Driver" button on the US-8/Main HOS screen
WARNING: BOTH DRIVERS MUST LOGIN TO THE UNIT WITHIN THE LAST 24 HOURS IN ORDER TO BE SELECTABLE AS THE CO-DRIVER
Related articles