Map display of Vehicles, Drivers, Geofences with Landmarks and Vehicle/Driver Geofence Events
Asset Tracking with Geofences and Routing to Landmarks
DriverTech Mapping provides the ability to view Vehicles, Vehicle/Driver Event History, Geofences, Fueling Locations, Weather Radar, Weather Forecast and perform interactive actions on these items:
Requirements
Geofence Events will only be generated from ELD running v6.08+
All other Mapping features are supported across all current versions of ELD
Map Assistance Controls
| Map assistance control bar is located at the Top-Left corner and provides the following capabilities |  | ||||||
|---|---|---|---|---|---|---|---|
|
|
|
|
|
|
|
|
| Opens up this page in a window. | Provides ability to override default settings on the Vehicles/Geofences/Fuel layers:
| Saves an image of the current view of map. | Toggle the map to completely fill the screen. | Click+Hold button to Tilt and Rotate Map. You may also right+click+hold over the Map to perform this action. TO RESET THE VIEW: Click this button
| Decrease/Increase view level of map. This can also be accomplished by using the mouse scroll wheel. | Adjust zoom level of map to display all available items on map. | Search for an arbitrary location or place. Results of search text will be constrained to the current map |


Toggle Controls
| Toggles provide a rapid way to Show/Hide/Change specific layers and data on the Map The Search Control provides an alternate way to Show or Filter Vehicles/Drivers, Geofences, or Fuel | |
|---|---|
 | Traffic layer toggleToggles display of Traffic On/Off.
|
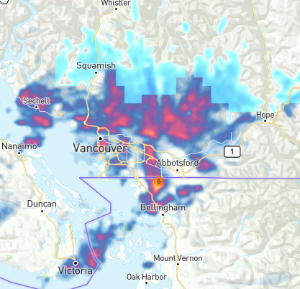
  | Weather Radar toggleToggles Weather Radar On/Off |
 | Satellite/Street layer toggleToggles the background rendering between Street and Satellite
|
 | Fuel layer toggleToggles display of Fuel Stops On/Off |
 | Vehicle layer toggleToggles display of Vehicles/Drivers On/Off.
|
 | Geofence layer toggleToggles display of Geofences On/Off
|
Search and Results Controls
| Search, Results and Geofence Creation Controls are located at the Top Right of the Map View | |||||||||
|---|---|---|---|---|---|---|---|---|---|
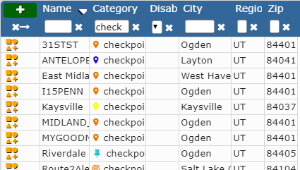
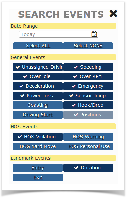
Search PanelAllows for searching/filtering of specific Vehicles/Drivers or Geofences. When a search/filter is is active, the Vehicle and Geofence Toggle Controls will indicate accordingly:
| |||||||||
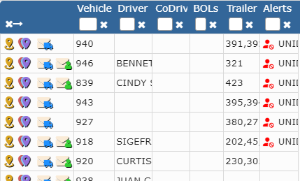
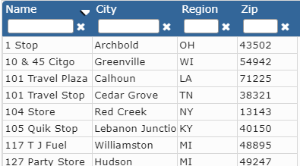
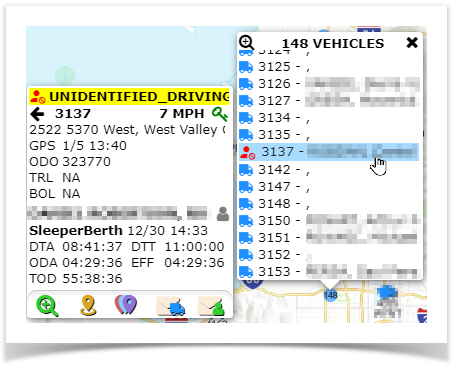
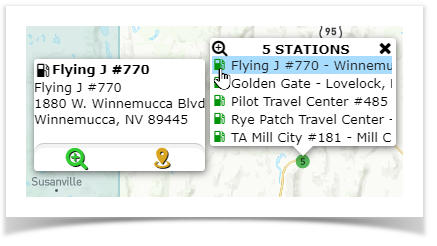
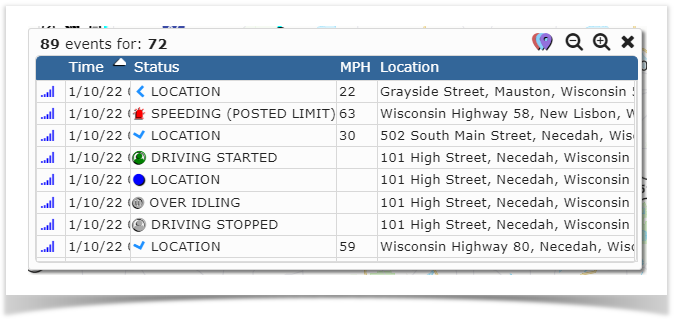
Results Panel - *the best* way to locate an item on the Map
| |||||||||
 | Geofence Create/Edit PanelAllows for Creating and Editing Geofence detail and its associated Geofence | ||||||||


Viewing Vehicle, Geofence and Fuel Detail
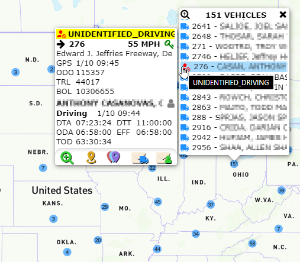
| Items on the map which can be selected include Vehicles, Geofences and Fuel locations, as well as, Clustered points of each. When Clicked or Touched a callout will appear providing information and available actions relative to the item selected. The following provides detail on what each type of marker provides. See General Controls (below) for information on how to control what is displayed on the map | ||||||||
|---|---|---|---|---|---|---|---|---|
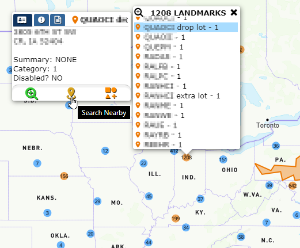
Vehicle Markers and Clusters | Geofence Markers and Clusters | Fuel Station Markers and Clusters | ||||||
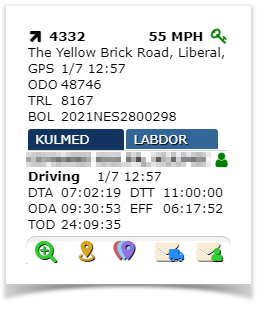
Clicking on a Vehicle Marker will open a window with further details/options for the Vehicle:
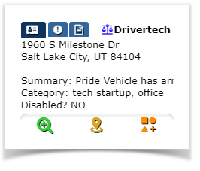
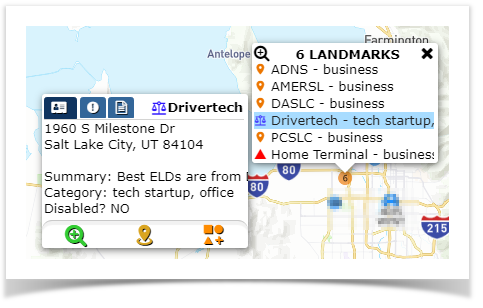
|  Indicates the Routing point of the Geofence as a Landmark. Indicates the Routing point of the Geofence as a Landmark. Icon may vary depending on the icon chosen when the Geofence was created. Clicking on a Geofence Polygon or a Landmark Marker will open a window with further details/options for the Geofence:
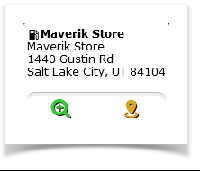
| Clicking on a Fuel Station Marker will open a window with further details/options for the Fuel Station:
| ||||||
|
|
| ||||||


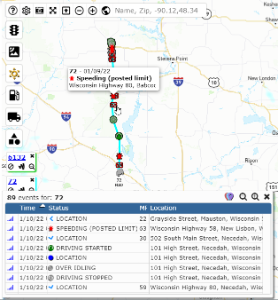
Vehicle/Driver Events Control
Historical vehicle events can be displayed on the map with a a specific icon and color for each event type for easy visual identification of Driver/Vehicle activity, route and direction over your desired date range. Currently available events that can be selected are: | ||
|---|---|---|
| General Events | HOS Events | Geofence Events |
|
|
|
Searching for and Interacting with Vehicle/Driver Events | ||||||
|---|---|---|---|---|---|---|
| FIRST | NEXT | FINALLY | ||||
To View the Vehicle/Driver Events
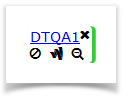
| Clicking this icon for a vehicle will bring up the Vehicle Events search pane (click to enlarge):
| Upon clicking
| ||||


Geofences with Landmarks
Geofences represent various points of interest on the map which include the Landmark (a routing point) and a Geofence Polygon.
![]() New and Modified Geofences are synchronized with your ELDs within only a few minutes of being created or edited.
New and Modified Geofences are synchronized with your ELDs within only a few minutes of being created or edited.
![]() Geofence Entry, Duration and Exit events are detected on the ELD itself (not via a backend server process using historical position data) which ensures near-realtime notification to Drivers, Managers and API Integrations!
Geofence Entry, Duration and Exit events are detected on the ELD itself (not via a backend server process using historical position data) which ensures near-realtime notification to Drivers, Managers and API Integrations!
Requirements
Geofence Events will only be generated from ELD running v6.07+
All other Mapping features are supported across all current versions of ELD
Limitations and Restrictions
- Companies cannot create more than 30,0000 Geofences
- Geofence Polygons cannot contain more than 3,000 vertices
- Geofences cannot be immediately deleted but can be "marked for deletion" (soft delete) and will be pruned from the system after an appropriate amount of time has passed.
Use Cases
Anything which is of interest to capture Entry of, Duration within, Fuel consumed within, Miles moved within and Exit has potential for creating a Geofence.
For Example:
- Customer Locations
- Customer Location sub-divided by Loading Dock to allow Driver Routing to the a specific area of the Customers Yard
- You may want to create a Geofence for each Dock area at very large distribution centers or yards
- Company Terminals
- Allows tracking of Miles and Fuel to enable deductions of movement within your own yards
- Counties which maintain their own Fuel Tax regulations
- Some counties offer Fuel Tax breaks which can be beneficial for companies to take advantage of. We recommend that you create a Geofence for each that you utilize often in order to gather the data required for filing with the State/County.
- It is not necessary for you to create Geofences for Each State or Province because DriverTech automatically includes these and provides the data within the State Mileage, Regional Crossing and Trip Detail reports.
- Oil Field Pumps or Pump Groups
- Allows for routing AND confirmation that a Vehicle/Driver was in an area of an Oil Field for necessary amount of time to perform duties
- Toll Roads
- You may want to alert the Driver if he is approaching a point of no-return toward a Toll Road
- Shipping Lanes
- Creating a Geofence around a shipping lane will provide you with the data required to analyze how well the lane moves at various times of the Day, Week, or Year.
These could be retained but simply 'disabled' when tracking is not desired.
- Creating a Geofence around a shipping lane will provide you with the data required to analyze how well the lane moves at various times of the Day, Week, or Year.
- Hazmat Prohibited Roads or Areas
- To provide an alert to the Driver and Management
- Unauthorized as determined by company policy or agreements (i.e. Unauthorized Fuel Stations)
- To provide an alert to the Driver and Management
- To provide an alert to the Driver and Management
- Low Bridges and Weight Restricted Bridges
- To provide an alert to the Driver upon approach
- Fuel Station and Travel Centers not already included in our global data set
- Please inform our Support of any additional Fuel Stations you want included in our global dataset used for the Fuel Purchases and Mapping features
- Various Preferred Locations for:
- Drug Testing
- Maintenance and Repair
- Weigh Stations
- Truck Washes
- Driver Favorites such as:
- Home
- Restaurants
- Motel and Hotels
Do you have a unique idea? Let Support know as we would love to help you accomplish it!
Creating and Editing Geofences
Creating New Geofences and configuring Landmarks
Geofence Creation can be initiated in the following ways:
- Right Click on the map and select the create/edit geofence Icon
- Click on the create/edit Geofence Icon on the Right side of the map view
- Click on the green
[+]at the top of the Geofence Results list
Geofence Add/Edit Icon:
Editing Existing Geofences and Landmarks
Geofence Editing can be initiated in the following ways:
- From the Map: Click on a Cluster or the Geofence Icon or within the Geofence to view the Detail then click the Geofence add/edit Icon near the bottom
- From the Results List of Geofences on the Right of the Map: Click on the create/edit Geofence Icon which appears at the left of the Row you are interested in editing
Geofence Add/Edit Icon:
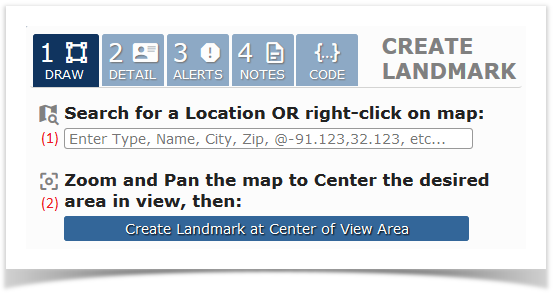
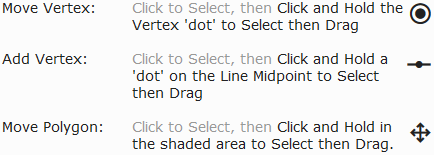
Drawing the Geofence | |
|---|---|
| (1) Search for a Location around which to create the Geofence using the textbox OR center the map on the area where you would like to create the Geofence. (2) Click the button Create Geofence at Center of View Area OR Right-Click the location on the map and select the (3) Adjust the Geofence area to fit the location as needed by performing the following:
(4) Move the Routing Point icon to the location that will be used as the destination where drivers will be routed to for the Geofence.
|
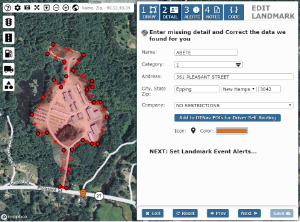
Adding Detail to the Geofence | |
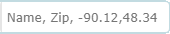
 | (1) Name: Enter a unique name that will be used to identify the Geofence. Multiple Geofences cannot have the same name.
Note - the only field required to be filled out when creating a Geofence is the Name (the company field is also used but will default to the first company in the list). |
Adding Alerts for Geofence | |
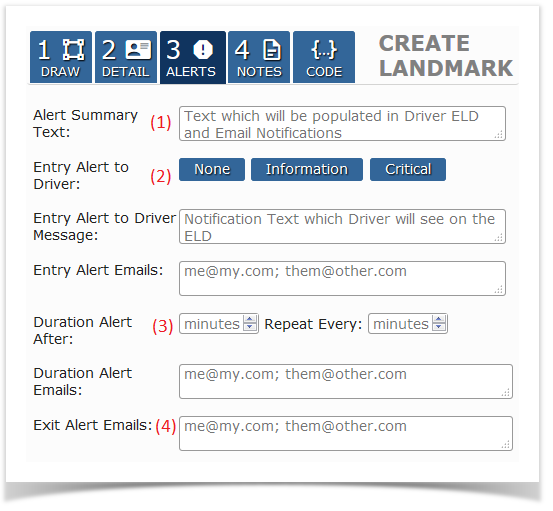 | (1) Alert Summary Text: Value which will be provided in Email Notifications
(2.b) Entry Alert Emails: Enter email addresses for those who should be notified upon Geofence Entry. (4) Exit Alert Emails: Enables an alert to be triggered after a vehicle has exited the Geofence area. Enter email addresses for people who will be notified upon an alert triggering. |
Notes for the Geofence | |
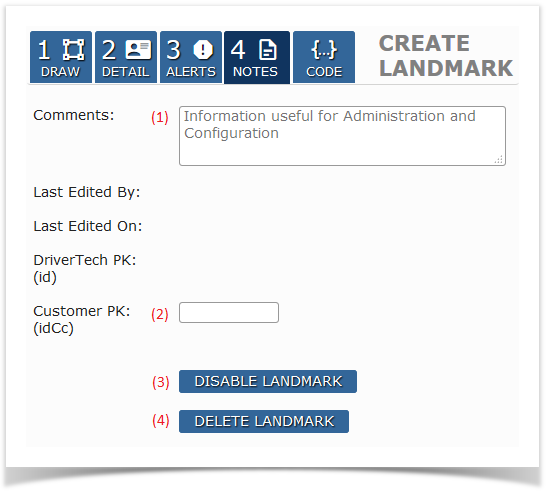 | (1) Comments: Enter any comments or details to be noted about the Geofence. (1.b) Last Edited By: Manager name who either created or was the last to edit the Geofence (1.c) Last Edited On: DateTime of the creation or last edit performed on the Geofence (2) Customer Primary Key: Primary key reference for the Geofence in the customer's system. |
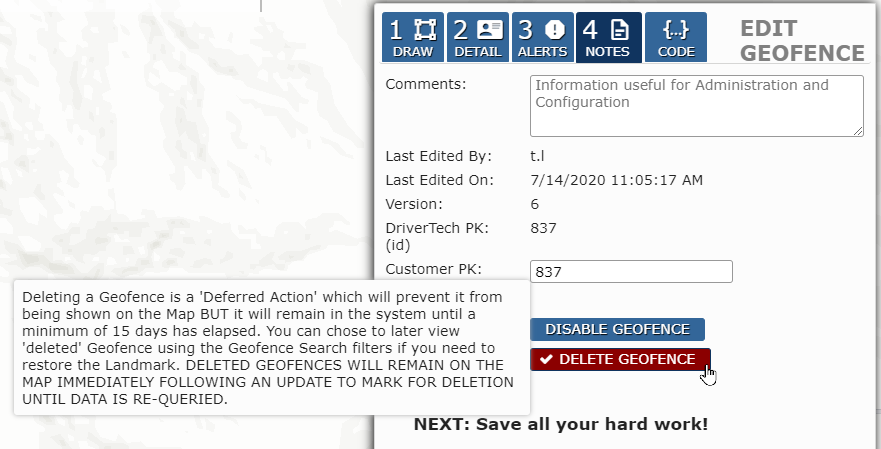
| Restoring a Deleted Geofence | |
 | Deleting a Geofence is a 'Deferred Action' which will prevent it from being shown on the Map BUT it will remain in the system until a minimum of 15 days has elapsed. A previously Deleted Geofence can be restored by
|


Geofence Creation Detail and Tips
Important Details which pertain to every Geofence
The following specifications MUST ALL be considered when creating or editing a Geofence to ensure successful and reliable Entry and Exit detection around various Geofence types
Due to the GPS Selective Availability combined with GPS Triangulation you MUST account for where Entry and Exit will occur based upon the Geofence Polygon.
ENTRY events will be triggered approximately 33' (10 meters) within the Geofence and EXIT events will be triggered approximately 66' (20 meters) outside of the Geofence.
- Geofence Entry: The vehicle must be at least 33' (10 meters) inside of the Geofence to trigger Entry
¹ Geofence Exit: The vehicle must be at least 66' (20 meters) outside of the Geofence to trigger Exit
Time Required: The vehicle must spend at least 10 seconds on either side of the Geofence in order to trigger entry or exit (in motion or not)
¹ Workflow Jobs with Location of either Lat/Lon/Rad or Geofence require that the Vehicle MUST ALSO cease motion after entering the Geofence to trigger Auto Arrival.
Example 1: Basic Building, Lot, Dock Geofence | |
|---|---|
This Geofence is designed to trigger when a vehicle has entered and stopped moving within the parking lot or loading dock in back of the building. In the example to the right:
| 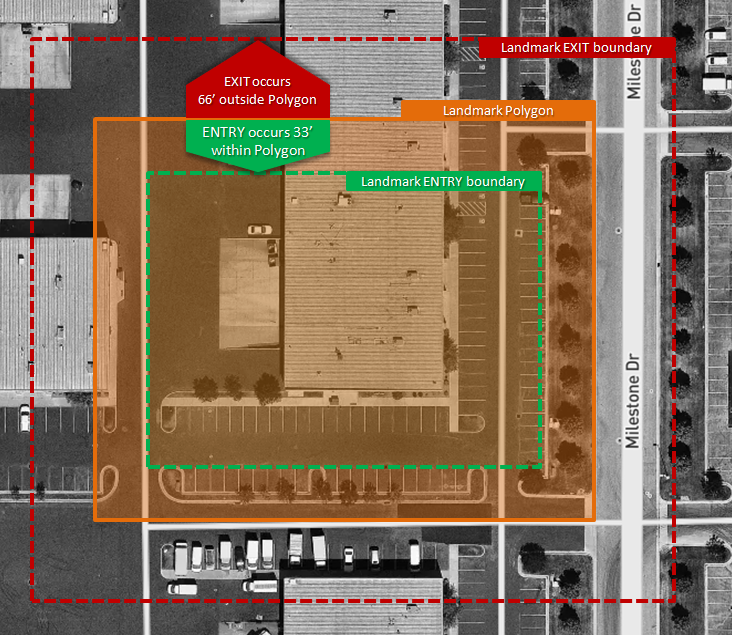 |
Example 2: Geofence with Smaller Entry Way | |
Ensure that Entry Ways are wide enough to support a minimum of 15’ in entry area PLUS 33’ on each side to ensure that the Driver triggers entry when moving onto the Entry Road prior to entering the larger part of the fence (i.e. the lot). |  |
See Also
Map display of Vehicles, Drivers, Geofences with Landmarks and Vehicle/Driver Geofence Events
Asset Tracking with Geofences and Routing to Landmarks
DriverTech Mapping provides the ability to view Vehicles, Vehicle/Driver Event History, Geofences, Fueling Locations, Weather Radar, Weather Forecast and perform interactive actions on these items:
Requirements
Geofence Events will only be generated from ELD running v6.08+
All other Mapping features are supported across all current versions of ELD
Map Assistance Controls
| Map assistance control bar is located at the Top-Left corner and provides the following capabilities | | ||||||
|---|---|---|---|---|---|---|---|
|
|
|
|
|
|
|
|
| Opens up this page in a window. | Provides ability to override default settings on the Vehicles/Geofences/Fuel layers:
| Saves an image of the current view of map. | Toggle the map to completely fill the screen. | Click+Hold button to Tilt and Rotate Map. You may also right+click+hold over the Map to perform this action. TO RESET THE VIEW: Click this button
| Decrease/Increase view level of map. This can also be accomplished by using the mouse scroll wheel. | Adjust zoom level of map to display all available items on map. | Search for an arbitrary location or place. Results of search text will be constrained to the current map |
Toggle Controls
| Toggles provide a rapid way to Show/Hide/Change specific layers and data on the Map The Search Control provides an alternate way to Show or Filter Vehicles/Drivers, Geofences, or Fuel | |
|---|---|
| Traffic layer toggleToggles display of Traffic On/Off.
|
| | Weather Radar toggleToggles Weather Radar On/Off |
| Satellite/Street layer toggleToggles the background rendering between Street and Satellite
|
| Fuel layer toggleToggles display of Fuel Stops On/Off |
| Vehicle layer toggleToggles display of Vehicles/Drivers On/Off.
|
| Geofence layer toggleToggles display of Geofences On/Off
|
Search and Results Controls
| Search, Results and Geofence Creation Controls are located at the Top Right of the Map View | |||||||||
|---|---|---|---|---|---|---|---|---|---|
Search PanelAllows for searching/filtering of specific Vehicles/Drivers or Geofences. When a search/filter is is active, the Vehicle and Geofence Toggle Controls will indicate accordingly:
| |||||||||
Results Panel - *the best* way to locate an item on the Map
| |||||||||
| | Geofence Create/Edit PanelAllows for Creating and Editing Geofence detail and its associated Geofence | ||||||||
Viewing Vehicle, Geofence and Fuel Detail
| Items on the map which can be selected include Vehicles, Geofences and Fuel locations, as well as, Clustered points of each. When Clicked or Touched a callout will appear providing information and available actions relative to the item selected. The following provides detail on what each type of marker provides. See General Controls (below) for information on how to control what is displayed on the map | ||||||||
|---|---|---|---|---|---|---|---|---|
Vehicle Markers and Clusters | Geofence Markers and Clusters | Fuel Station Markers and Clusters | ||||||
Clicking on a Vehicle Marker will open a window with further details/options for the Vehicle:
| Indicates the Routing point of the Geofence as a Landmark. Icon may vary depending on the icon chosen when the Geofence was created. Clicking on a Geofence Polygon or a Landmark Marker will open a window with further details/options for the Geofence:
| Clicking on a Fuel Station Marker will open a window with further details/options for the Fuel Station:
| ||||||
|
|
| ||||||
Vehicle/Driver Events Control
Historical vehicle events can be displayed on the map with a a specific icon and color for each event type for easy visual identification of Driver/Vehicle activity, route and direction over your desired date range. Currently available events that can be selected are: | ||
|---|---|---|
| General Events | HOS Events | Geofence Events |
|
|
|
Searching for and Interacting with Vehicle/Driver Events | ||||||
|---|---|---|---|---|---|---|
| FIRST | NEXT | FINALLY | ||||
To View the Vehicle/Driver Events
| Clicking this icon for a vehicle will bring up the Vehicle Events search pane (click to enlarge):
| Upon clicking
| ||||
Geofences with Landmarks
Geofences represent various points of interest on the map which include the Landmark (a routing point) and a Geofence Polygon.
![]() New and Modified Geofences are synchronized with your ELDs within only a few minutes of being created or edited.
New and Modified Geofences are synchronized with your ELDs within only a few minutes of being created or edited.
![]() Geofence Entry, Duration and Exit events are detected on the ELD itself (not via a backend server process using historical position data) which ensures near-realtime notification to Drivers, Managers and API Integrations!
Geofence Entry, Duration and Exit events are detected on the ELD itself (not via a backend server process using historical position data) which ensures near-realtime notification to Drivers, Managers and API Integrations!
Requirements
Geofence Events will only be generated from ELD running v6.07+
All other Mapping features are supported across all current versions of ELD
Limitations and Restrictions
- Companies cannot create more than 60,000 Geofences
- Geofence Polygons cannot contain more than 1,000 vertices
- Geofences cannot be immediately deleted but can be "marked for deletion" (soft delete) and will be pruned from the system after an appropriate amount of time has passed.
Use Cases
Anything which is of interest to capture Entry of, Duration within, Fuel consumed within, Miles moved within and Exit has potential for creating a Geofence.
For Example:
- Customer Locations
- Customer Location sub-divided by Loading Dock to allow Driver Routing to the a specific area of the Customers Yard
- You may want to create a Geofence for each Dock area at very large distribution centers or yards
- Company Terminals
- Allows tracking of Miles and Fuel to enable deductions of movement within your own yards
- Counties which maintain their own Fuel Tax regulations
- Some counties offer Fuel Tax breaks which can be beneficial for companies to take advantage of. We recommend that you create a Geofence for each that you utilize often in order to gather the data required for filing with the State/County.
- It is not necessary for you to create Geofences for Each State or Province because DriverTech automatically includes these and provides the data within the State Mileage, Regional Crossing and Trip Detail reports.
- Oil Field Pumps or Pump Groups
- Allows for routing AND confirmation that a Vehicle/Driver was in an area of an Oil Field for necessary amount of time to perform duties
- Toll Roads
- You may want to alert the Driver if he is approaching a point of no-return toward a Toll Road
- Shipping Lanes
- Creating a Geofence around a shipping lane will provide you with the data required to analyze how well the lane moves at various times of the Day, Week, or Year.
These could be retained but simply 'disabled' when tracking is not desired.
- Creating a Geofence around a shipping lane will provide you with the data required to analyze how well the lane moves at various times of the Day, Week, or Year.
- Hazmat Prohibited Roads or Areas
- To provide an alert to the Driver and Management
- Unauthorized as determined by company policy or agreements (i.e. Unauthorized Fuel Stations)
- To provide an alert to the Driver and Management
- To provide an alert to the Driver and Management
- Low Bridges and Weight Restricted Bridges
- To provide an alert to the Driver upon approach
- Fuel Station and Travel Centers not already included in our global data set
- Please inform our Support of any additional Fuel Stations you want included in our global dataset used for the Fuel Purchases and Mapping features
- Various Preferred Locations for:
- Drug Testing
- Maintenance and Repair
- Weigh Stations
- Truck Washes
- Driver Favorites such as:
- Home
- Restaurants
- Motel and Hotels
Do you have a unique idea? Let Support know as we would love to help you accomplish it!
Creating and Editing Geofences
Creating New Geofences and configuring Landmarks
Geofence Creation can be initiated in the following ways:
- Right Click on the map and select the create/edit geofence Icon
- Click on the create/edit Geofence Icon on the Right side of the map view
- Click on the green
[+]at the top of the Geofence Results list
Geofence Add/Edit Icon:
Editing Existing Geofences and Landmarks
Geofence Editing can be initiated in the following ways:
- From the Map: Click on a Cluster or the Geofence Icon or within the Geofence to view the Detail then click the Geofence add/edit Icon near the bottom
- From the Results List of Geofences on the Right of the Map: Click on the create/edit Geofence Icon which appears at the left of the Row you are interested in editing
Geofence Add/Edit Icon:
Drawing the Geofence | |
|---|---|
| (1) Search for a Location around which to create the Geofence using the textbox OR center the map on the area where you would like to create the Geofence. (2) Click the button Create Geofence at Center of View Area OR Right-Click the location on the map and select the (3) Adjust the Geofence area to fit the location as needed by performing the following:
(4) Move the Routing Point icon to the location that will be used as the destination where drivers will be routed to for the Geofence.
|
Adding Detail to the Geofence | |
| (1) Name: Enter a unique name that will be used to identify the Geofence. Multiple Geofences cannot have the same name.
Note - the only field required to be filled out when creating a Geofence is the Name (the company field is also used but will default to the first company in the list). |
Adding Alerts for Geofence | |
| (1) Alert Summary Text: Value which will be provided in Email Notifications
(2.b) Entry Alert Emails: Enter email addresses for those who should be notified upon Geofence Entry. (4) Exit Alert Emails: Enables an alert to be triggered after a vehicle has exited the Geofence area. Enter email addresses for people who will be notified upon an alert triggering. |
Notes for the Geofence | |
| (1) Comments: Enter any comments or details to be noted about the Geofence. (1.b) Last Edited By: Manager name who either created or was the last to edit the Geofence (1.c) Last Edited On: DateTime of the creation or last edit performed on the Geofence (2) Customer Primary Key: Primary key reference for the Geofence in the customer's system. |
| Restoring a Deleted Geofence | |
| Deleting a Geofence is a 'Deferred Action' which will prevent it from being shown on the Map BUT it will remain in the system until a minimum of 15 days has elapsed. A previously Deleted Geofence can be restored by
|
Geofence Creation Detail and Tips
Important Details which pertain to every Geofence
The following specifications MUST ALL be considered when creating or editing a Geofence to ensure successful and reliable Entry and Exit detection around various Geofence types
Due to the GPS Selective Availability combined with GPS Triangulation you MUST account for where Entry and Exit will occur based upon the Geofence Polygon.
ENTRY events will be triggered approximately 33' (10 meters) within the Geofence and EXIT events will be triggered approximately 66' (20 meters) outside of the Geofence.
- Geofence Entry: The vehicle must be at least 33' (10 meters) inside of the Geofence to trigger Entry
¹ Geofence Exit: The vehicle must be at least 66' (20 meters) outside of the Geofence to trigger Exit
Time Required: The vehicle must spend at least 10 seconds on either side of the Geofence in order to trigger entry or exit (in motion or not)
¹ Workflow Jobs with Location of either Lat/Lon/Rad or Geofence require that the Vehicle MUST ALSO cease motion after entering the Geofence to trigger Auto Arrival.
Example 1: Basic Building, Lot, Dock Geofence | |
|---|---|
This Geofence is designed to trigger when a vehicle has entered and stopped moving within the parking lot or loading dock in back of the building. In the example to the right:
| |
Example 2: Geofence with Smaller Entry Way | |
Ensure that Entry Ways are wide enough to support a minimum of 15’ in entry area PLUS 33’ on each side to ensure that the Driver triggers entry when moving onto the Entry Road prior to entering the larger part of the fence (i.e. the lot). | |
See Also