Versions Compared

Key

  • This line was added.
  • This line was removed.
  • Formatting was changed.

...

Drawing the Geofence

(lightbulb) Click here for Important Information and Tips for drawing Viable and Reliable Geofences (lightbulb)

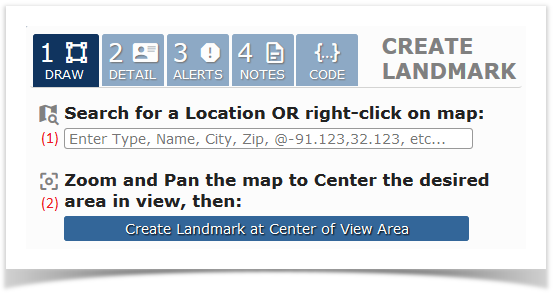
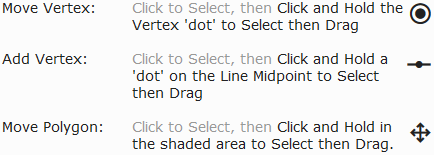
(1) Search for a Location around which to create the Geofence using the textbox OR center the map on the area where you would like to create the landmark.

(2) Click the button Create Geofence at Center of View Area OR Right-Click the location on the map and select the  icon from the menu.

(3) Adjust the Landmark area to fit the location as needed by performing the following:

(4) Move the Routing Point icon to the location that will be used as the destination where drivers will be routed to for the Geofence.

Adding Detail to

Landmark

the Geofence

(1) Name: Enter a unique name that will be used to identify the Geofence. Multiple Geofences cannot have the same name.


(2) Category:
Enter term(s) that will be used to categorize the Geofence, with each term separated by a comma or space.


(3) Address:
Enter the address of the Geofence.


(4) Company:
Leave BLANK to allow ALL VEHICLES to utilize the Geofence -OR- Select the Company to restrict Geofence availability to only the Vehicles assigned to the Company.

  • LEAVE THIS BLANK IF UNSURE as Associating a Geofence with a Company will cause it to be private and usable ONLY by the Vehicles assigned that company


(5) Add to DTNav POIs for Driver Self Routing:
Checking this box will also add the Geofence to the DTNav POI database, allowing the Driver to find and self route to the Geofence.

  • Requires ELD v6.08+ and DTNav v1.04+


(6) Color of Geofence and Landmark Icon:
Select the Icon that will be used to identify the Geofence on the map, along with the color to use for the Geofence.

Note - the only field required to be filled out when creating a Geofence is the Name (the company field is also used but will default to the first company in the list).

Adding Alerts for

Landmark

Geofence
Anchor
landmarkAlerts
landmarkAlerts

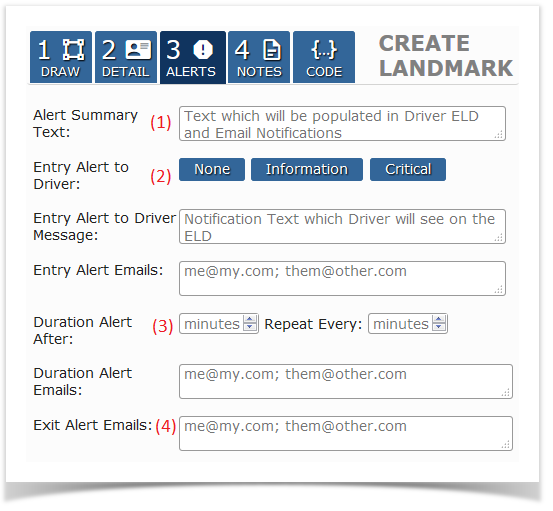
(1) Alert Summary Text: Value which will be provided in Email Notifications


(2.a) Entry Alert to Driver:
Enables an alert to be triggered upon a vehicle entering into the Geofence.
Select either Information or Critical to enable the Entry Alert to Driver, followed by the message that will be displayed to the driver upon triggering.

  • None:  No Alert will be displayed on the ELD when Vehicle moves within the Geofence
  • Information: Alert will be displayed on the ELD using the Information Notification Bubble:
  • Critical:   Alert will be displayed on the ELD using the Critical Notification Bar:
  • Entry Message: The text which will be presented in the Notification

(2.b) Entry Alert Emails: Enter email addresses for those who should be notified upon Geofence Entry.
This is Independent of the settings for Entry Alert to Driver and will be triggered even if Entry Alert to Driver is set to 'none'


(3) Duration Alert Minutes and Notification Emails:
Enables an alert to be triggered after a vehicle has remained inside the Geofence area for X amount of minutes, followed by repeated alerts for every Y amount of minutes the vehicle has continually remained in the Geofence area. Enter email addresses for people who will be notified upon an alert triggering.

(4) Exit Alert Emails: Enables an alert to be triggered after a vehicle has exited the Geofence area. Enter email addresses for people who will be notified upon an alert triggering.
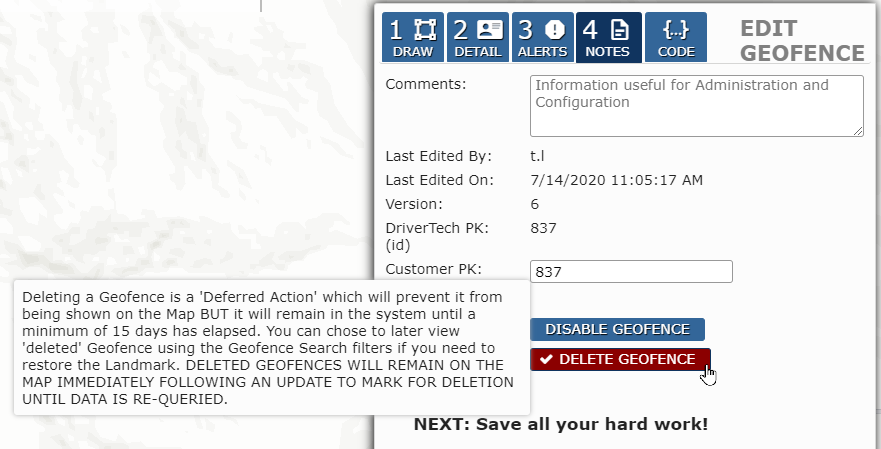
Notes for

Landmark

the Geofence

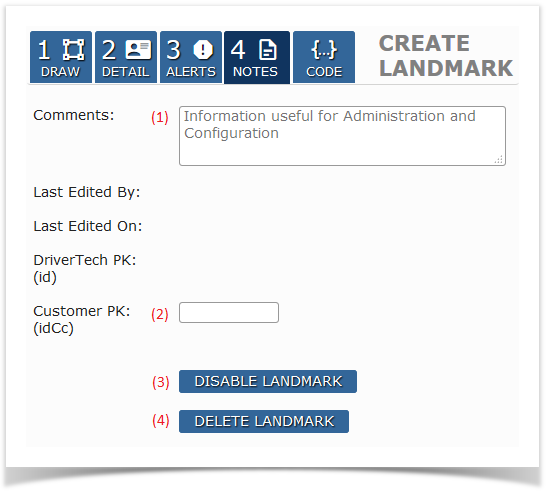
(1) Comments: Enter any comments or details to be noted about the Geofence.
These are shown in the  tab of the window that appears when clicking on the landmark on the map.

(1.b) Last Edited By: Manager name who either created or was the last to edit the Geofence

(1.c) Last Edited On: DateTime of the creation or last edit performed on the Geofence

(2) Customer Primary Key: Primary key reference for the Geofence in the customer's system.


(3) Disable Landmark:
Disabling the Geofence will prevent events from being generated, however it will still be visible on the map.


(4) Delete Geofence:
Deleting a Geofence is a 'Deferred Action' which will prevent it from being shown on the Map BUT it will remain in the system until a minimum of 15 days has elapsed.
(lightbulb) A previously Deleted Geofence can be restored by Searching for Geofence using the Deleted filter option to view the landmark and allow editing to un-check this box. See "Restoring a Geofence" below.

Restoring a Deleted Geofence 

Deleting a Geofence is a 'Deferred Action' which will prevent it from being shown on the Map BUT it will remain in the system until a minimum of 15 days has elapsed.

 A previously Deleted Geofence can be restored by

  1. Searching for Geofence using the Deleted filter option to include the geofence in the Results and on the Map
  2. Select the Geofence on the Map, or locate in the Results list, and click the Edit button:
  3. Select the "NOTES" tab and click on "Delete Geofence" to deselect the item
  4. Save the change

...