Forms / Macros are an industry standard way of providing structured templates to ensure both consistency and reduced communication costs when messaging Drivers.
The following document provides detail on how to configure Forms on the Web Portal for use between Integrations, Web Portal, Vehicles and Drivers
Background on why Forms and Macros exist
Cutting costs may be the top priority of today's businesses, but streamlining processes is close behind. DriverTech helps with both. How? With forms. Our state-of-the-art functionality allows your dispatchers and drivers to communicate efficiently and cost-effectively.
- Save money - The cost of electronic messages is determined by the number of characters (alpha and/or numeric) sent over the air. With DriverTech's unique forms functionality, your company pays only for the information that populates open fields, not for the field descriptors. Descriptions are housed with both the dispatcher and the driver. Unique information used to populate a form at origin, populates the same form at destination.
- Save minutes - There's no need to reinvent the wheel every time a dispatcher communicates instructions to a driver (or a driver responds to a dispatcher's request). Forms condense the process. The DriverTech system provides all the options you need to create user-friendly forms that accomplish exactly what you want them to accomplish with minimum effort on the part of drivers and dispatchers.
- Save now - Think about communication. Think about what you need to improve the transfer of information. Think about what your forms can do for you. For example:
Goal: Perhaps you need to cut down on the number of back-and-forth messages used to accomplish a single task.
Option : Create a form that includes mandatory fields. If those fields are not complete, the form cannot be sent. An error message appears reminding the driver to provide the requested informationGoal: Perhaps you need to reduce the number of typos in the information received from your driver.
Option : Create fields tied to the truck's computer system that automatically populate such information as odometer readings and fuel consumption.
Identify the purpose of your form. Identify the fields necessary to accomplish that purpose. Then, use this guide to create the forms you want with the parameters you need.
Read the field descriptions in the next section before you begin to structure your forms. Maximize your results. You may find solutions to problems you have yet to identify!
Creating and Maintaining Forms via the Web Portal
Viewing details of existing Forms
Existing form details can be viewed by clicking anywhere on a Form Row within the table causing the detail to be populated into a read-only view the of edit fields
Creating New Forms
From the FleetWatcher menu, choose Management then Forms. You will be presented with a table of current forms (if any exist). You may select a current form from the table for viewing.
To add a new form, select Add Form button which is above the grid.

The opening screen has three fields and a check box that allow you to add a new form to your form library.
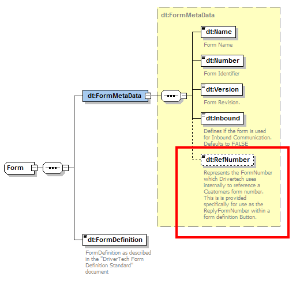
New Form Information Screen:
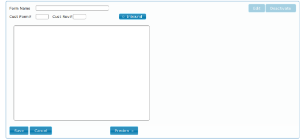
- Form Name: Title of the form which will be displayed to users.
- Cust Form #: Customers Form number associated with this form.
- Cust Rev #: Customers Form Revision number associated with this form.
- Inbound (check box): Specifies whether a form is outbound or inbound; outbound is the default.
- Form Definition: Field where you define the structure of the new form.
- Preview Results: After you enter the FDL into the text box you may preview the form by clicking the "Preview" button at bottom center. The preview will appear to the right.
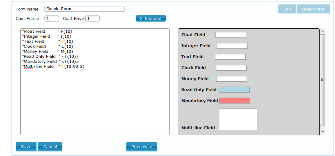
Using the Form Definition Field
With your purpose identified and necessary fields specified, you are ready to build your form. The process is easy. Simply choose the types of fields you want included from the Fields Description section and customize them using options from the Field Definition Language (FDL) section.
Exhibit 5 is an example of how the process works. The instructions given in the Form Definition field define the final product shown in the Form Preview. The steps involved are explained below. By applying the pad option, embedded blanks, and the strip option to the field descriptions, you can design your form to match the look you want.
Steps for Creating a new Form
- Determine the order and placement of the fields for your form.
- Decide what parameters you want placed on the information for each field.
- Select appropriate Field Descriptions.
- Customize the Field Descriptions using FDL.
- Click Preview Button (bottom center) to see your form displayed in the preview pane.
- Make any appropriate changes to the Form Definition field so the final product is exactly the way you want it to be.
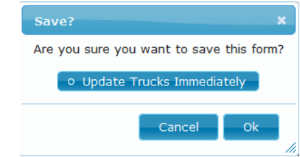
- Click Save button (bottom left).
You will be presented with the following confirmation. If you select "Update Trucks Immediately" (false by default) your instructing the system to push the new form out to all vehicles right now.
If you dont select "Update Trucks Immediately" then the new form will be communicated to the fleet on-demand or during each ELD's individual communication transaction.
Editing and Disabling Forms
To edit a preexisting form, select the desired form by clicking on it in the spreadsheet list, then click [edit]
. Make the desired changes, then click
[save]
You can also choose to disable a form. This will remove the form either from the drop-down for forms in the portal Mail application or on the in-cab unit, if it has been selected as an Inbound message. Click
[deactivate] to deactivate a form.
Field Definition Language (FDL) Specification
Forms are built using fields. In the Field Descriptions section of the guide, we outline all the fields available to you. In the Create a Form section, we show you how the process works.
In this section, we explain the Field Definition Language (FDL) used to customize your form fields to suit your purposes.
The table below summarizes the FDL Characters you use in your formulas to define input controls.
Form and Field Configuration Limitations
The Maximum Number of Forms (both Inbound and Outbound) is 127
The Maximum Number of Characters within a Form (the FDL which describes a form) is 4000 characters.
- The Number of Fields on a form is only limited by how many you can specify within 4000 characters FDL limit.
- Text fields within a form can store up to 2000 characters.
- Other fields such as integer, numeric, date, time are limited by their own precision. For example an unsigned integer can store values from 0 to 4294967295.
- Auto-Fill fields within a form are limited to a total of 32.
FDL Character Overview
| FDL Character | Character Application and Handling |
|---|---|
" " | Characters enclosed in double quotes become static text. |
< > | Fields enclosed in angle brackets are mandatory. |
{ } | Text that is book-ended by curly brackets is read-only. |
[ ] | Straight brackets automate the process of populating a field. |
* | The asterisk, or star symbol, hides the information inserted in a field. |
# | The pound sign represents a number (any number) in a mask-field formula. |
? | The question mark represents any alpha character in a mask-field formula. |
~ | The tilde (or swung dash) can be used in a mask-field formula to represent any keyboard character. |
+ | The plus sign is used in mask-field formulas to represent either plus or minus signs. |
I | The upper-case letter I is used to designate unsigned integers. |
i | The lower-case letter i is used to designate signed integers. |
T | Upper-case T designates text fields. |
R | Upper-case R establishes an auto-reply field. |
L | Upper-case L defines a list. |
Defining the Size of Input Fields
Many of the input boxes can be sized by placing the character width in parentheses just after the FDL character indicating the field type.
| FDL Definition | Application |
|---|---|
T(35) | 35 characters per field |
L(10) | 10 characters per line |
Maximum input character functionality
In addition, you can define the maximum number of characters that can be entered in a field. To use this feature, you must also use the size option. For example, to create a text field with a size of 20 characters and maximum input of 10 characters, you would use the following T(20:10).
The table below shows sample field widths and input maximums for the FDL field types that support the maximum input character functionality.
| FDL Definition | Field Width | Max Input Characters | When a formula includes bracketed information, the term length may appear both inside and outside the brackets as highlighted by the superscript numbers in the sample format below:
When length appears only once in a formula, the field width is the same for the back end as it is for the ELD. |
T(10:8) | 10 | 8 | |
L(6:2) | 6 | 2 |
FDL Field Detail
| Field Modifiers | Format Type | Example | Notes | |
|---|---|---|---|---|
Standard FieldsFields not defined as Mandatory or Read-Only work as regular input or description form fields. These are the most common and are defined below in this table. Any standard field can be modified to operate as a Mandatory or Read-Only using the following characters: | ||||
Mandatory Modifier | < field() > | <T(10)> | Mandatory fields are obvious on a form only when they are described as mandatory, or when a user attempts to send a form without completing such a field and receives an error message. TIP! It is helpful (but not required) to provide information about which fields are Mandatory by including a note at the top of your form stating An * indicates a required field; then use the static text functionality to include an * next to each mandatory field | |
Read-Only ModifierFields enclosed in { } (curly brackets) become read-only and all field types below support Read-Only definition. | { field( ) } | {T(10)}
| There is no need to identify read-only text on your form. Should a driver attempt to change a read-only field, an error message appears to explain the field's status | |
Field Descriptions Each field description includes the following information:
The descriptions are designed for modularity. We meet with you to assess your requirements, bundle the options you need together, then provide you with the formulas for the other options so you can modify your set as your company evolves.
Also common to multiple formulas are brackets. When a formula includes brackets, the term length may appear both inside and outside the brackets as highlighted by the superscript numbers in this formula: T(length 1)[P=length 2,padChar,justificationLeftRight]. The term functions as follows:
When length appears only once in a formula, the field width is the same for the back end as it is for the ELD. | ||||
| Field Type | Format Type | Example | Example Result | Notes |
Static Text (Comments)Field descriptions are created using Static Text. Anything enclosed by " " (double quotes) is displayed as static text on the form. Static text can be composed of any characters (alpha, numeric, or symbols) | "Static text here" | "Name" | Name | Name fields composed of static text are closed fields. Generally, static text is used to identify the form (title) and delineate sections (heads and sub-heads), to explain the form's use, and to indicate the information to be provided in associated open fields |
Free Form (Text Box)Free-form text boxes accept alphabetic, numeric, or special characters configured in a variety of ways. These fields can store data padded with trailing blanks to fill out the field to its full length when the pad option is used. | T(length) | T(10) | ABCDEFGHIJ | |
| T(length:MaxChars) | T(10:8) | 12345678_ _ | ||
| T(length:MaxChars:height) | T(30:200:10) | This is a multi-line text field. In the example, 30 equals the width of the text box, 200 equals the maximum number of characters allowed in the box, and 10 equals the length of the box. | ||
| T[P=length, padChar, justificationLeftRight] | T[P=10, ,R] T[P=10, ,L] | _ _ _ ABcd123 | ||
Mask Field (multi-purpose)This is the most flexible do-it-all field. Use the following symbols to define the content for the mask field:
| T[M=maskChars] | T[M=###] | 123 | |
| T[M=+###] | -123 | Using value: -1234 | ||
| T[M=???] | ABC | Using value: ABCDE | ||
| T[M=~~~~~~~~~~] | A1,?+=#'(b | Using value: A1,?+=#'(b | ||
| T[M=###???~~~] | 123ABC*,$ | Using value: 123ABC*,$ | ||
Mask Field Options (deprecated)Warning! These definitions are not functional on all platforms. Using this alternate format you can pad the field with a specific character or optionally strip characters out when the strip option (S) is used at the time the form is sent to the data center. | T[M=padChar,maskChars | stripOption] | T[M=0,##-??-~~] | 01-0a-0* | |
| T[M=###.# | S] | 123.4 | Using value: 1234 | ||
| T[M=???-?? | S] | ABC-DE | Using value: ABCDE | ||
Numeric / DecimalThis field accepts number only, and they are entered from right to left. | T(length)[F=N,numbers to the left of decimal,numbers to the right of decimal, padChar] |
| 123.45 | |
T[F=N,3,0, ] | _12 | |||
T[F=N,5,0,0] | 00123 | |||
T[F=N,3,3] | _ _1.234 | |||
AlphaThis field accepts only alpha characters. | T[M=?...] | T[M=?????] | ABCDE | |
Unsigned IntegerThis field accepts numbers only. Sign characters (+ or −) are not accepted. | T(length)[F=I | P=length,padChar,justificationRightLeft] | T(10)[F=I | P=10, ,L] | 12345_ _ _ _ _ | |
T(10)[F=I | P=10, ,R] | _ _ _ _ _12345 | |||
T(10)[F=I | P=10,0,R] | 0000012345 | |||
Signed IntegerThis field accepts numbers and an optional positive or negative sign (+ or −) as the leading character. | T(length)[F=i | P=length,padChar,justificationRightLeft] | T(10)[F=i | P=10, ,L] | −12345_ _ _ _ | |
T(10)[F=i | P=10, ,R] | _ _ _ _−12345 | |||
Full Field IntegerThis field accepts numbers only. Leading and trailing spaces are not accepted. | T[M=###...##] | T[M=#####] | 12345 | |
MonetaryThis field has a dollar sign ($) fixed as the first character. | T[M=$####.##] | T[M=$###.##] | $_ 7.45 _ | |
| T(length)[F=N,numbers to the left of decimal,2,padChar] | T(6)[F=N,3,2, ] | _ _7.45 | ||
Date | T(length)[F=D | S ]
| T(10)[F=D] | 10/22/1995 | Long Date: This field accepts numbers in a long date format (mm/dd/yyyy). The entire field must be filled in. |
T(10)[F=D | 10221995 | Long Date without Slash | ||
T(length)[F=d | S ]
| T(8)[F=d] | 10/22/95 | Mid Date: This field accepts numbers in the date format (mm/dd/yy). If the field is not filled, six blanks with two slashes (_ _/_ _/_ _ ) are stored, or if the strip option is applied, six blanks ( _ _ _ _ _) are stored. | |
T(8)[F=d | S] | 102295 | Mid Date without Slash | ||
T(length)[F=d | S ]
| T(5)[F=S] | 04/25 | Short Date | |
T(5)[F=S | S] | 0425 | Short Date without Slash | ||
Time (24 hr clock)This field accepts a 24-hour time entry in the hh:mm format. | T(length)[F=C | S ]
| T(5)[F=C] | 21:45 | Time (24hr) |
T(5)[F=C | S] | 2145 | Time (24hr) without Colon | ||
Date and Time | See: Auto-Fill DateTime | |||
Library Content (File reference)This field is used to link library content to a form. This field is displayed as a button on a form and when pressed it launches the content in the library. | T(length:MaxChars)[F=BL] | T(10:30)[F=BL] | The content of the field contain both the file name to be launched within the library and an optional description. The file name is separated from the optional description with a '~' character (i.e. <file name>~<description>). If no description is provided then the file name will be used for the button description. Here are some examples:
| |
Phone # (w/area code)This field accepts a phone number entry with an area code in the format nnn-nnn-nnnn | T[M=### - ### - ####] | T[M=### - ### - ####] | 123-456-789 | |
Item ListThis field accepts any item belonging to an associated list of items. TIP! Various pre-configured lists of commonly used terms are available for your use in various list types can be referenced using the following values:
| L(length:Item1, Item2 ,ItemN) Warning! Value of | L(6:1234,ABCD,AA11BB) | A list of trucks might include items such as Peterbilt, Volvo, or Freightliner. | |
Item List L1: Y or NThis field holds a single character: either Y or N. The field can be constructed to show one or the other as the default | T(length)[F=L1] | T(1)[F=L1] | Y | Y/N via defined list type: L1 |
Item List L2: Weekday AbbreviationThis field accepts a three-character day abbreviation (Sun, Mon, Tue,…, Sat) | T(length)[F=L2] | T(3)[F=L2] | Sun | Weekdays via defined list type: L2 |
Item List L3: Month AbbreviationThis field accepts a three-character month abbreviation (Jan, Feb,…,Dec) | T(length)[F=L3] | T(3)[F=L3] | Jan | Months via defined list type: L3 |
Item List L4: US States AbbreviationThis field accepts a two-character US State abbreviation (AL,AK,…,WY) | T(length)[F=L4] | T(2)[F=L4] | AL | States via defined list type: L4 |
Item List L5: Canadian Province AbbreviationThis field accepts a two-character Canadian Province abbreviation (AB, BC,…,YT) | T(length)[F=L5] | T(2)[F=L5] | AB | Canadian Provinces via defined list type: L5 |
Item List L6: Mexican State AbbreviationThis field accepts a two-character Mexican Province abbreviation (AG,BJ,…,ZT) | T(length)[F=L6] | T(2)[F=L6] | AG | Mexican Provinces via defined list type: L6 |
Item List L7: North American State or Province AbbreviationThis field accepts a two-character US State, Canadian Province, or Mexican State abbreviation | T(length)[F=L7] | T(2)[F=L7] | AL | North American State or Province via defined list type: L7 |
Auto-Fill or Auto-Population of DataIts often valuable to more accurate to have form data automatically populated instead of requiring manual entry. Below are various data elements which support auto-population | ||||
Odometer (in miles)This formula automatically populates a text field with the truck's lifetime odometer reading at the time the form is pulled up.The odometer reading can be displayed with or without the MI (miles) designation (#o = with, #O = without) | T(length)[#O | P=length,padChar,left or right justification]
| T(11)[#O] | 75000.0 | |
T(11)[#o] | 75000.0 MI | |||
T(11)[#O | P=11,0,R] | 000075000.0 | |||
T(11)[#o | P-11,0,R] | 000075000.0 MI | |||
Fuel (in gallons)This formula automatically populates a text field with the truck's lifetime fuel consumption at the time the form is accessed.Fuel consumption can be shown with or without GAL appended (#f = with, #F = without) | T(length)[#F | P=length,padChar,left or right justification]
| T(11)[#F | P=11,0,R] | 0000050000.0 | |
T(11)[#f | P=11,0,R] | 0000050000.0 | |||
Date and TimeThis formula creates a text field that automatically populates with the current date and time at the time the form is accessed. Warning! The value in this field is not validated after being set or modified. | T(length)[#T] | T(20)[#T] | 17:02 04/07/2009 170204072009 | Date and Time (24hr) Date and Time (24hr) without Colon, Space, or Slash |
| D[#T] | D[#T] | 04/07/2009 04072009 | Long Date | |
| d[#T] | d[#T] | 04/07/09 040709 | Mid Date Mid Date without Slash | |
| S[#T] | S[#T] | 04/07 0407 | Short Date Short Date without Slash | |
| C[#T] | C[#T] | 17:02 1702 | Time (24hr) Time (24hr) without Colon | |
LocationThis formula defines a text field that automatically populates the vehicle's current position by latitude and longitude. | T(length)[#P] | T(20)[#P] | 40.7293,-111.9654 | |
Trailer(s) - BiDirectional updates to and from HOSThis formula defines a text field that automatically populates the vehicle's current hooked trailer(s). Up to 3 possible hooked trailers. This formula defines a text field that automatically populates the last supplied Trailer(s). The Trailer(s) value comes from either the last entered Trailer(s) Value on the drivers HOS logs, or the last form/macro with a Trailer(s) auto-fill field. The value comes from either HOS logs or a form/macro depending on which occurred last. You will need device software 6.07.xx or newer for this functionality to work. | T(length)[#H1] T(length)[#H2] T(length)[#H3] T(length)[#H] |
| 13000 23000 33000
13000,23000,33000 | Trailer 1 Trailer 2 Trailer 3 All 3 trailers or up to 3 trailers (if exist) comma separated |
Trailer(s) - UniDirectional update of HOSThis formula defines a text field that saves/updates trailer(s) entered by a driver. Up to 3 possible hooked trailers. Unlike its BiDirectional counterpart, this field will not retrieve an updated value from HOS and can only be updated by the Driver. Also see the "Auto-Fill Variables" section below. | T(length)[@H1] T(length)[@H2] T(length)[@H3] T(length)[@H] |
| 13000 23000 33000
13000,23000,33000 | Trailer 1 Trailer 2 Trailer 3 All 3 trailers or up to 3 trailers (if exist) comma separated |
BOL (Bill of Lading / Shipping document number) - BiDirectional updates to and from HOSThis formula defines a text field that automatically populates the last supplied BOL. The BOL value comes from either the last entered BOL on the drivers HOS logs, or the last form/macro with a BOL auto-fill field. The value comes from either HOS logs or a form/macro depending on which occurred last. You will need device software 6.07.xx or newer for this functionality to work. | T(length)[#B] | T(20)[#B] | B1O1L B1O1L,B2O2L,B3O3L | Single or Multiple BOL(s) values |
BOL (Bill of Lading / Shipping document number) - UniDirectional update of HOSUnlike its BiDirectional counterpart, this field will not retrieve an updated value from HOS and can only be updated by the Driver. Also see the "Auto-Fill Variables" section below. | T(length)[@B] | T(20)[@B] | B1O1L B1O1L,B2O2L,B3O3L | Single or Multiple BOL(s) values |
Auto-Fill: VariablesAn auto-fill variable is typically used to transfer value(s) between a forward and return form. For example: if the load# that is on the forward form needs to be populated on the return form, then an auto-fill variable can be used to facilitate this. | ||||
Storing dataData is 'stored' into an specific position of an array using the @ char | T(length)[@n] | T(20)[@1] | Stores form field value into array element 1 Storage Array is limited to 30 elements beginning at 1: @1, @2, @3, ... @30 | |
Retrieving dataData is 'retrieved' from a specific position of an array using the # char | T(length)[#n] | T(20)[#1] | Retrieves value from array element 1 into form field Storage Array is limited to 30 elements beginning at 1 and data retrieved using the # char: #1, #2, #3, ... #30 Note:
| |
Auto-Reply with Specific Macro/FormThis form definition syntax makes it possible to automate part of the information on a driver's reply form. | [R=<form#>] | [R=20] |
This form definition syntax imposes itself on a driver's response. | |