Map display of Vehicles, Drivers and Landmarks
Mapping
DriverTech Mapping provides the ability to view Vehicles, Landmarks and Fueling Locations and perform interactive actions on these items.
Overview with images describing control areas (not detail of each) for General Controls (i.e. help/settings/pan/zoom), Toggles and Search, Results, Landmark+Geofence Editing
Requirements
Landmark Events will only be generated from ELD running v6.06+
All other Mapping features are supported across all current versions of ELD
Overview of Map Features

Map Assistance Controls

Help
Opens up this page in a window.
Settings
Not yet implemented.
Screenshot
Saves an image of the current view of map.
Fullscreen
Toggle the map to completely fill the screen.
Tilt and Rotate
Click and holding button while dragging mouse right or left will rotate view of map clockwise or counter-clockwise (respectively). Click button to reset back to original view.
Click and holding button while dragging mouse up or down will tilt view of map up or down (respectively).
This can also be accomplished by moving the mouse accordingly while right button is held down anywhere on the map.
Zoom In/Out
Increase/decrease view level of map.
This can also be accomplished by using the mouse scroll wheel.
Zoom out to All Items on Map
Adjust zoom level of map to display all available items on map.
Display Item Toggle Controls
 Traffic layer
 Satellite/Road view
 Fuel layer
 Vehicle layer - automatic timer countdown until layer refresh to update vehicle status and position. Click on the timer to refresh instantaneously.
 Landmark layer
Display Item Search and Results Controls
![]() Search/filter map for Vehicles/Drivers or Landmarks.
Search/filter map for Vehicles/Drivers or Landmarks.
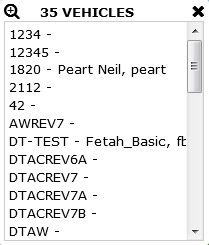
![]() Results contains the list of objects being displayed on the map, split into three separate tabs:
Results contains the list of objects being displayed on the map, split into three separate tabs:
 Vehicles
 Landmarks
 Fuel Stations
When a search/filter is being performed on the map, the Vehicle and Landmark Toggle Controls will indicate accordingly:
 Indicates the Vehicle layer is being filtered.
 Indicates the Landmark layer is being filtered.
Vehicle Events Control
![]() Clicking this icon for a vehicle will bring up the Vehicle Events search pane (as shown below):
Clicking this icon for a vehicle will bring up the Vehicle Events search pane (as shown below):

After clicking Get Results, the following control will be added to the map for that particular vehicle:

 /
/ hide/show events for vehicle on the map
 show/hide lines connecting each event for vehicle
 zoom to the events for vehicle
 remove the events for vehicle from the map
 clicking on the name of the vehicle will open a list of the events (as shown below):
 zoom to events
 zoom to vehicle
 close list of events
Landmark Edit Control
![]() Clicking this icon for a landmark will open up a dialog to edit the landmark details.
Clicking this icon for a landmark will open up a dialog to edit the landmark details.
Click here for detail on how to Add/Edit Landmarks
Vehicle, Landmark and Fuel Display Detail
Items on the map which can be selected include Vehicles, Landmarks and Fuel locations, as well was, Clustered points of each.
When Clicked or Touched a callout will appear providing information and available actions relative to the item selected.
The following provides detail on what each type of marker provides. See General Controls (below) for information on how to control what is displayed on the map
Vehicle Markers and Clusters
![]() Indicates a Moving Vehicle
Indicates a Moving Vehicle
![]() Indicates a Stationary Vehicle
Indicates a Stationary Vehicle
Clicking on a Vehicle Marker will open a window with further details/options for the Vehicle:

 Zoom to Vehicle
 Search nearby Vehicle
 Search for Vehicle and Driver Events
 Send Message to Vehicle
 Send Message to Driver
![]() Indicates a Cluster of Vehicles. Clicking on a Cluster will open a List of the Vehicles (as show below):
Indicates a Cluster of Vehicles. Clicking on a Cluster will open a List of the Vehicles (as show below):
Landmark Markers and Clusters
![]() Indicates a Landmark. Also denotes the route-to location for the Landmark. Icon may vary depending on the icon chosen when the Landmark was created.
Indicates a Landmark. Also denotes the route-to location for the Landmark. Icon may vary depending on the icon chosen when the Landmark was created.
Clicking on a Landmark Marker will open a window with further details/options for the Landmark:

Zoom to Landmark
Search nearby Landmark
 Edit Landmark details
![]() Indicates a Cluster of Landmarks. Clicking on a Cluster will open a List of the Landmarks (as shown below):
Indicates a Cluster of Landmarks. Clicking on a Cluster will open a List of the Landmarks (as shown below):

Fuel Station Markers and Clusters
![]() Indicates a Fuel Station.
Indicates a Fuel Station.
Clicking on a Fuel Station Marker will open a window with further details/options for the Fuel Station:

Zoom to Fuel Station
Search nearby Fuel Station
![]() Indicates a Cluster of Fuel Stations. Clicking on a Cluster will open a list of the fuel stations (as shown below):
Indicates a Cluster of Fuel Stations. Clicking on a Cluster will open a list of the fuel stations (as shown below):

Landmarks with Geofence
Overview...
Requirements
Landmark Events will only be generated from ELD running v6.06+
All other Mapping features are supported across all current versions of ELD
Creating a New Landmark
 Located on the right edge of the map beneath results
 Located near the top left corner of the Results panel
 Located on the menu that appears when right-clicking anywhere on the map
Drawing the Landmark

1) Enter the location of the landmark in the textbox OR center the map on the area where you would like to create the landmark.
2) Click the button Create Landmark at Center of View Area OR Right-Click the location and select the icon from the menu.
3) Adjust the Landmark area to fit the location as needed.
4) Move the Routing Point icon to the location that will be used as the destination where drivers will be routed to for the Landmark.

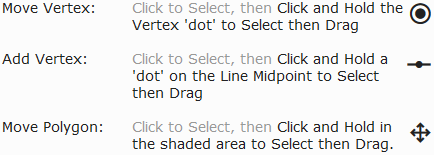
Click here for further detail on shaping geofences
Adding Detail to Landmark
1) Name
2) Category
3) Address
4) Company
5) Add to Address Book
6) Icon/Color of Fence
Adding Alerts for Landmark
1) Alert Summary Text
2) Entry Alert
3) Duration Alert
4) Exit Alert
Notes for Landmark
1) Comments
2) Customer PK
3) Disable/Delete Landmark
Landmark Shaping Detail
Examples of what to do and not do when creating geofences
See Also
Landmark Events